Rabu, 25 Agustus 2010

New Tools to Debug Your Tracking Code

Raise your hand if any of this sounds familiar to you:
  • You just set up your tracking code and you're wondering if it's correct--and you want to know right now.
  • You have decided to migrate your tracking to the new asynchronous syntax--but you want to know if your syntax has any errors.
  • You finally decided to customize the tracking code for cross-domain tracking--but you're worried that you might break your tracking.
  • You want to make sure that your campaign is set up to the correct goal.
Enter: The Google Analytics Tracking Code Debugger and a new debug version of our JavaScript code.

The Google Analytics team has launched a debugging version of the Analytics Tracking code called ga_debug.js to verify your tracking code setup. To make it even simpler, we also created a Chrome extension which uses the ga_debug.js script, which allows you to use the new ga_debug.js without re-tagagging any of your content. You can also use this extension to verify what information is sent to Analytics with each page.

How does it work? First, the ga_debug.js script provides a testing version of the tracking code which will print common syntax errors and tracking analysis messages to the browser’s JavaScript console. Secondly, the Chrome extension which automatically enables your page to use the debug version of the JavaScript without any need for you to retag or recode your pages.

How do you use it? The most simple thing to do is to download the Tracking Code Debugger extension for your Chrome browser. Next, turn on the extension by clicking on the icon to the right of the address bar on Chrome.

Finally, visit a page that contains the tracking code you want to test and open up the Chrome JavaScript console to see the messages (detailed instructions). That's it!

If you want to go use ga_debug.js without the Chrome extension, read all about how to do this in our newly revised Troubleshooting Guide on Google Code. You can use the script on your testing environment to verify extensive tracking code changes. Make sure, however, that you don't use this version of the tracking code on your production website--the script is meant for debugging and analysis, not speed, so you should always use this as a testing mechanism only. If you want to learn more about the kinds of errors this script can help you find, see Common Tracking Code Errors/Typos in our Troubleshooting Guide. While the ga_debug.js script doesn’t catch all possible errors yet, we think it’s off to a great start and will get even better over time.

Happy testing!

Brian Kuhn on behalf of the Analytics Team

Back to Basics: Fast Segments with Analytics Intelligence

Did you know that there’s a quick way to create advanced segments from automatic alerts? This is one of those “I can’t believe how powerful this is and yet so easy to do” features. Let me illustrate with an example from the Google Store site. A few months ago, on February 5, the Google Store received a surge of traffic from TechCrunch.com. We would not have noticed this extra traffic were it not for Analytics Intelligence. In the following screenshot, you can see that the store ordinarily receives between 0 and 221 visits from TechCrunch, but on this day, it received 1,918 visits.


What happened was that TechCrunch ran an article about Google scarves that were being sold in the store. But, here’s the tip I want to share with you. First, you can graph just the
relevant traffic simply by clicking the button on the alert.


And, you can create an advanced segment just by clicking the Create Segment link at the far right of the alert.


Now you can compare this traffic side by side with overall site traffic or with traffic from other segments. Check out this video to see how this works and to learn more automatic alert tips.

Posted by Alden DeSoto, Google Analytics Team

Selasa, 24 Agustus 2010

Introducing Weighted Sort

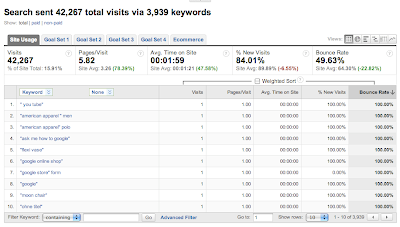
Have you ever sorted a report by bounce rate and seen nothing but entries with a 100% bounce rate? Have you then noticed that these entries only have 1 visit? Not only is this useless and frustrating, but it obscures the real data points that you care about behind pages of garbage.


Well fret no more! We are pleased to announce a new sorting algorithm called weighted sort. Now when you sort on a computed metric, you can weight that sort by the number of data points, bringing you the most interesting and actionable rows first. For instance, in our example weighted sort will weight the computed value bounce rate by the number of visits. Let's take a look at some screen shots that will make this effect more obvious.

Senin, 23 Agustus 2010

New Verification Integration With Asynch

Nobody likes to duplicate effort. Unfortunately, sometimes it's a fact of life. If you want to use Google Analytics, you need to add a JavaScript tracking code to your pages. When you're ready to verify ownership of your site in other Google products (such as Webmaster Tools), you have to add a meta tag, HTML file or DNS record to your site. They're very similar tasks, but also completely independent. Until today.

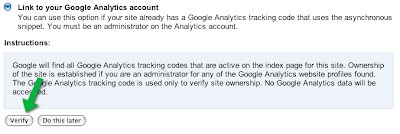
You can now use a Google Analytics JavaScript snippet to verify ownership of your website, which is the start of using the rich information about your organic ranking and organic traffic available in Webmaster Tools. If you already have Google Analytics set up, verifying ownership is as simple as clicking a button.

This only works with the newer asynchronous Analytics JavaScript, so if you haven't migrated yet, now is a great time. If you haven't set up Google Analytics or verified yet, go ahead and set up Google Analytics first, then come verify ownership of your site. It'll save you a little time — who doesn't like that? Just as with all of Google Webmaster Tools' other verification methods, the Google Analytics JavaScript needs to stay in place on your site, or your verification will expire. You also need to remain an administrator on the Google Analytics account associated with the JavaScript snippet.

Don't forget that once you've verified ownership, you can add other verified owners in Webmaster Tools (not Google Analytics) quickly and easily through the Verification Details page. There's no need for each owner to manually verify ownership. More effort and time saved!

Webmaster Central has also introduced an improved interface for verification. The new verification page gives you more information about each verification method. In some cases, we can now provide detailed instructions about how to complete verification with your specific domain registrar or provider. If your provider is included, there's no need to dig through their documentation to figure out how to add a verification DNS record — the new interface will walk you through it.

The time you save using these new verification features might not be enough to let you take up a new hobby, but we hope it makes the verification process a little bit more pleasant. Please visit the Webmaster Help Forum if you have any questions. And much thanks to the Webmaster Central team for launching this feature. If you're not already, make sure to read their informative blog. It's a must for any site owner.

Jumat, 20 Agustus 2010

A Better Developer Doc Experience

Now that the excitement of the new Management API launch has just passed its zenith, you might have also noticed that there were some interesting changes to the Analytics for Developer pages on Google Code.

Since Nick, Alex, and I were under the hood making docs and sample code for the Management API, it also seemed like a good time to spiff up the site and add some structure to handle this burgeoning developer resource.

New Look and Feel
Nick went to town on our new home page. If you attended his talk at the Google I/O conference this May, you might notice that the Analytics data model diagram has reappeared, but this time as a gateway into the key parts of our documentation on Google Code. We surfaced the most important links to provide deep access to the key parts of each section of the site.

New Landing Pages
Since we now have 3+ major sections on our site, it was time to provide landing pages for all the news and updates relevant to Tracking Code configuration, Management API, and Export API. Here you will always be able to see the latest release news and best practice guides for each API without having to dig down into the site.

We’ve also redesigned our navigation bar to be more visually appealing and consistent across all three APIs.

New Groups Pages
We have three major developer groups to help you out with your Analytics coding--Async tracking, Management API, and Export API. Not only that, but our general Help Forum is great for issues with general tracking topics. Since we have so many different groups, we created a new groups landing page to help you figure out which group will help you best.

Our Management API and Export API groups use the new Google Discussion Forum, which is embedded right in the page--a pretty nifty feature.

We hope that you find the new design makes it clearer and easier for you to find what you need for Analytics development. We’d love to hear your feedback, so please post any comments on one of our developer groups pages and let us know.

Patricia Boswell on behalf of the Analytics API team.

Kamis, 19 Agustus 2010

New Google Blog For SMBs

Most every business, including Google's, starts small. These days, technology is giving businesses even more ways to grow bigger, faster.

In a recent series on the Official Google Blog focused on small businesses, a handful of real-life entrepreneurs shared their experiences building companies from scratch and embracing internet tools that have taken their businesses to the next level. The team received fantastic feedback about these posts, and realized that there’s a healthy appetite among small- and medium-sized business owners who want to know all about the latest web tools and tricks. And obviously, Google Analytics is one of the best, in our humble opinion. :-)

That’s why we’re giving an introductory shout out to the new Google Small Business Blog here on our blog. It's a central hub that brings together all the information about Google products, features and projects of specific interest to the small business community. Rather than having to sleuth around in many different locations for details about templates for creating video ads on YouTube, tips for your employees using Gmail or how to respond to the business reviews on your Place Page, you can find all of this helpful information right here in one place. And we'll be contributing content on Google Analytics there as well.

They already have a few great posts, with more to come, and we're confident their audience will continue to grow, much like a small successful business.

Rabu, 18 Agustus 2010

Launched: New Google Analytics Management API!

Many developers have asked for a faster, more powerful way to access Google Analytics account configuration data through the Data Export API. We’ve listened and today we’re releasing a preview of the new Google Analytics Management API.

The Management API provides read-only access to Google Analytics configuration data. It consists of 5 new Google Data Feeds that map directly to the Google Analytics data model.


Previously, the API returned all the configuration data at once, which in many cases was inefficient if you only needed a subset of data. Now with separate feeds, developers can request only the data they need. For example, it’s now easy to get the Profile IDs for a single account or the Goal configuration data for only a single Profile.

To help you learn more we created a new Management API section in our developer documentation. We also created new reference examples in Java and have a live working demo in JavaScript. Check it out, no coding needed!

The Management API is being launched in Labs as an early preview. The API will change, grow, and get better over time. We recommend developers who aren’t committed to making updates to their applications only experiment with the new API and continue to use the Account Feed as their primary source for configuration data. We will strive to give you at least one month advanced notice of changes to this API.

The Management API represents a significant new piece of the Google Analytics developer platform. We encourage you to come try it out and give us feedback in our new Management API Google Group.

Thanks!
Jeetendra M. Soneja, on behalf of the Google Analytics API team

P.S. - Please make sure to sign-up for our notify list to stay up-to-date on all the latest Google Analytics Developer updates.

Jumat, 13 Agustus 2010

Launch: Intelligence Just Got Smarter!

Hopefully, by now, you’re making good use of the Intelligence report in Google Analytics. If you’re looking to avoid the feeling that Google Analytics is “puking” too much data at you - a phrase coined by Google’s beloved analytics evangelist Avinash Kaushik - you're not alone. We've heard you, and Intelligence is your first stop. As we mentioned in a previous post introducing Intelligence, it’s your dedicated assistant, monitoring your website traffic for significant changes that you should know of. Wondering what’s going on under the hood of your site traffic? Intelligence will tell you.

And it’s improving and getting smarter. Here are two improvements we’re announcing today.

New! AdWords Alerts

If you have linked your Google Analytics account with an AdWords account, Intelligence will now automatically surface important changes in your AdWords campaigns performance right in Google Analytics. So, in addition to the alerts you are used to getting, such as time on site and revenue, you’ll now receive alerts about your AdWords campaigns and the traffic they are bringing to your website.

You might already be familiar with custom alerts in Google AdWords, which alert you when important changes you specify happen in your account. With AdWords alerts in Analytics Intelligence, you benefit from automatic detection of significant changes, with no extra work for you to configure these yourself. For example, you might see an alert if the CTR for one of your campaigns increased unexpectedly. Or you might find that revenue from one of your destination URLs has dropped significantly from the week before. In both cases, you didn’t need to know ahead of time what to look for. These important changes are automatically detected and brought to your attention.

Here's how to use them. AdWords alerts in Analytics Intelligence work just like automatic alerts have in the past. You can learn more about how to use Analytics Intelligence here: http://www.google.com/analytics/analytics-intelligence.html.

In order to use AdWords alerts in Analytics Intelligence, you need to have a linked AdWords account. Additionally, you need to have destination URL auto-tagging turned on. If you already use the AdWords reports in Analytics, you’re all set.

1. Sign into your Analytics account

2. Select Intelligence from the left-hand navigation

3. Choose daily (default), weekly, or monthly alerts

Directly underneath the graph, you’ll see check boxes for Custom Alerts, Web Analytics, and AdWords, which is next to the orange arrow in image above.

If you want to focus solely on your AdWords alerts, you can uncheck Custom Alerts and Web Analytics. Then, you can adjust the sensitivity slider to see just the most significant alerts or create an advanced segment to more closely investigate the change.

New #2! More options in Custom Alerts

It always easy to create a custom alert if there is a metric you’d like Intelligence to specifically monitor. See the orange arrow again, below:

You name the alert, apply it to a profile, designate a time period, and then set conditions for the visitor (such as City matches New York, or Campaign matches Fall Sale), and the metric (such as time on site greater than 5 minutes, or % of new visits is greater than 30%).

And now, we’ve added a ton more options in the Alert Conditions drop downs, including all of the 20 goals you have configured in each profile. They’ve also been dressed up for a night on the town, wearing their actual goal names such as “Goal8 Value: Visited >10 pages.” Only goals that you have configured will show up in the list, keeping the drop-down menu clean and courteous.

Among the other conditions and metrics now available: e-commerce and AdWords metrics, as well as more traffic sources, and more content page metrics. And remember, you can tell Intelligence to email you when an alert is triggered.

Intelligence is getting smarter and smarter, making you more effective. Try it out if you haven’t already.


Rabu, 11 Agustus 2010

Back to Basics: Filtering Keywords


Let’s say you’re only interested in keywords that brought in visitors who spent at least 2 minutes on your site.


When you enter the condition for Avg Time on Site, you’ll need to use seconds. So, here, we’ve entered 120 seconds (=2 minutes).

Or, perhaps you only want the keywords with a bounce rate of less than 30%. (Make sure you use .3 for 30%. So, for example, .05 is 5%, .25 is 25%, and 1 is 100%.)


You can even enter multiple conditions. In this case, we want to weed out all the low traffic keywords as well.


Advanced Filters are a great way to focus on your most important keywords. To see this example in action, watch this short video.


Selasa, 10 Agustus 2010

Web Analytics TV #11 with Avinash and Nick

Yay! It’s another episode of Web Analytics TV!

In this exciting series, with Avinash Kaushik and Nick Mihailovski, you ask, and vote on your favorite, web analytics questions via the Google Analytics Google Moderator site and we answer them.

This episode was particularly awesome since there were some fantastic questions. Tough questions that made us think hard. But also questions that made us proud of how sophisticated Google Analytics users are.

In this action packed episode we discuss:

  • Google Website Optimizer and the ga.js async tracking code issue
  • What is considered Personally Identifiable Information (PII)?
  • Teaching Google Analytics the location of your local __utm.gif image
  • Implementing ecommerce tracking with multiple currencies
  • Goal names in Google Analytics
  • Similarities and differences between Visitors and Unique Visitors metrics
  • Lovely opportunities for developers to build products using our API
  • Reasons why utm_content values show up as (not set)
  • Best practices for applying segments to specific pages (cool answer!)
  • Implementing ecommerce tracking if you don’t have an order id
  • Using advanced filters in the connection speed report
  • Why the value “other” shows up in your reports
  • Tracking how a visitor finds a site the first time for attribution
  • Correlating business data with Google Analytics data


Here are the links to the topics we discuss:

As always, if you need help setting up Google Analytics or leveraging the advanced configuration options, we recommend hiring a Google Analytics Certified Partners.

If you found this post or video helpful, we'd love to hear your comments. Please share them via the comment form below.

If you have a question you would like us to answer, please submit a question and vote for your favorite question in our public Google Moderator site. Avinash and I will answer your latest questions in a couple of weeks with yet another entertaining video.


Senin, 09 Agustus 2010

Segment Your Funnels Through The API

Say your website has a check out lead generation process and you want to understand funnel abandonment by new vs. return visitors. You can do this through the Web Interface using many segments, filters and exporting data. But who has time for that?

Enter the free, shiny, new Conversion Tracking Application from PadiTrack. Built on the Google Analytics API, it’s all about insights and action. You simply register with the site, use secure oAuth to access your data, and you’re off, creating useful funnels like this - notice the black box with “415 new” denoting the number of new visitors in the funnel:


According to Claudiu, CoFounder of PadiCode, the company that built PadiTrack, "We wanted to make accessible conversion funnel tracking, one of the most important analytics reports, to any web business out there. It has always amazed us how many websites don't have conversion funnel tracking defined in their web analytics accounts. We were challenged by that reality. Since we've built PadiTrack, we've been using it daily for all of our projects. We love it. It saves time, offers instant insight and helps us focus on what really matters for us: how many people convert."

With PadiTrack you can almost instantly visualize the conversion funnel for any major event. It works for sales, sign-ups, downloads, contact inquiries and anything else you can think of. The setup takes 3 or 4 minutes, conversion funnels can be created on the fly and and you don't need to wait to gather data: it is available retroactively. The product is available to all Google Analytics users and to them only.

“We played with a couple of web analytics APIs so far but the Google Analytics one has been the most powerful. It gave us the power to work with data and pull out reports that we couldn't get otherwise. We spent much more time building the interface than getting the reports out of the Google Analytics. The API is really easy,” says Claudiu.

We’re really excited about what the PadiCode team has built and are featuring it in our App Gallery. Have a look and let the PadiCode team know what you think.


Rabu, 04 Agustus 2010

Back to Basics: Keyword/Landing Page Combinations

Starting today, we’re reinstating the Back To Basics series. Each Wednesday, we’ll share a Google Analytics tip, usually something that you can try right away with your own data to gain new insights. This week, we’ll illustrate a quick way to see how many visits you get from different keyword/landing page combinations.

A friend of mine recently created several new landing pages that she hoped would attract traffic. She wanted to see at a glance whether people who searched on her top keywords were seeing the new pages. While she knew that she could use the Top Landing Pages report to analyze each individual landing page, she wanted to see keyword/landing page combinations in a single report.

There’s an easy way to do this. Go to the Keywords report under Traffic Sources. Look over to the right above the table and you’ll see Views: followed by a set of buttons. Click the Pivot view (5th button from the left). Now, look to the left, above the table, and you’ll see a Pivot by dropdown menu. Select Landing Page from this menu.


VoilĂ ! The keywords will be listed down the side and landing pages will be listed across the top. You can now see how many visits you received for each keyword/landing page combination.


You can see up to five landing pages listed across the top of the report. You can scroll horizontally (across the landing pages) using the arrow buttons at the top right of the table.


The pivot view is also really useful for seeing at a glance how many visits you get from each keyword and search engine combination. To do this, you’d use the same Keywords report and pivot by Source.

That’s this week’s tip. We’ll be back next Wednesday for another Back to Basics post.