Jumat, 31 Mei 2013

Membuat Horizontal Floating Share Sosial Di Blogger


satu-delapan-blogspot

Sebelumnya mau curhat dikit, maaf karena baru sempat posting karena belakangan ini banyak tugas campus dan juga kesehatanku yang kurang baik. Nah, di weekend yang ceria ini saya ingin berbagi widget sosial share floating atau melayang horizontal. Pasti Anda sudah tidak asing lagi mendengarnya karena pada postingan sebelum saya banyak membahas tentang tutorial widget sosial melayang dengan gaya horizontal maupun vertikal. Tapi widget ini berbeda dengan yang telah saya bahas sebelumnya, karena widget ini akan ditempatkan di bawah judul posting dan akan melayang bersama dengan layar saat Anda scroll ke bawah. Berikut fitur widget horizontal sosial share floating:
  • widget dilengkapi dengan tombol sosial sepert facebook, twitter dan google+.
  • menggunakan jQuery yang sederhana sehingga lebih cepat saat load
  • mengapung sampai bagian komentar blog
  • sebuah ikon link komentar yang akan mengarahkan pengunjung ke kotak komentar

    satu-delapan-blogspot

Artikel Terkait :


Menambahkan Horizontal Floating Share Bar di blog :

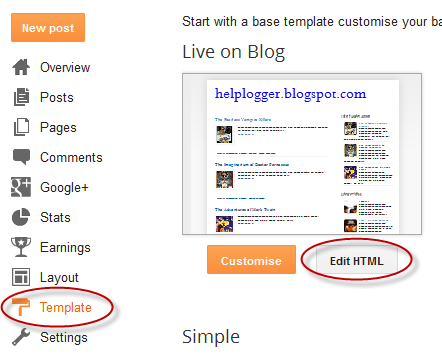
  • Login ke Blogger Anda - klik Template dan pilih Edit HTML
  • Cari tag </head>, gunakan Ctrl+F untuk mencari
  • Selanjutnya salin kode dibawah ini tepat sebelum tag </head>
<b:if cond='data:blog.pageType == &quot;item&quot;'>
<style type='text/css'>
/*<![CDATA[*/
    .horizontalsocial .sharertitle{float: left; border-right: 1px solid #d2d2d2; padding: 3px 10px 2px 0px; margin: 0 0px 0 0; color: #b1a9a5; font-family:'Oswald', Arial, Helvetica, sans-serif;text-transform: uppercase; line-height: 25px; vertical-align: middle;  font-size: 14px;}
    .horizontalsocial .fb-like{width: 100px; float: left; border-right: 1px solid #d2d2d2; padding: 3px 0 2px;  height: 25px; }
    .horizontalsocial .sharertwitter{float: left; width: 115px; border-right: 1px solid #d2d2d2; margin: 0 15px 0 0; padding: 3px 0 2px; height: 25px;}
    .horizontalsocial .sharergplus{float: left; width: 90px; margin: 0 15px 0 15px; padding: 3px 0 2px; border-right: 1px solid #d2d2d2; height: 25px;}
    .horizontalsocial .sharerbubble{background: url(http://2.bp.blogspot.com/-Zenaemr3nKw/USzIGk9FTTI/AAAAAAAAB6A/1_wR3MU5Wms/s1600/Commentz.png) no-repeat;  height: 25px; min-width: 25px; float: left; margin: 7px 0 0; line-height: 18px; vertical-align: top;}
    .horizontalsocial .sharerbubble a{color: #2d2520;  padding: 0px 0 0px 30px; font-size: 18px !important; font-family: 'Lora', Arial, Helvetica, san-serif !important; }
    .horizontalsocial.fixed{ position:fixed; top: -2px; z-index: 99999;}
    #w2bSocialFloat {clear:both;padding: 6px 0;display:block;background:#FFFFFF;}
    #w2bSocialFloat td{padding:4px;margin:0;border:none;}
    #w2bSocialFloat td iframe{max-width:82px;width:82px !important;}
    #w2bSocialFloat.w2bFloatSocial{position: fixed;top:0;z-index:9999999;border-bottom:1px solid #ccc;-webkit-box-shadow:0 1px 1px rgba(0,0,0,0.15);-moz-box-shadow:0 1px 1px rgba(0,0,0,0.15);box-shadow:0 1px 1px rgba(0,0,0,0.15);}
/*]]>*/
</style>
<script type="text/javascript">
/*<![CDATA[*/
// Set the Top Offset
$theOffset = 0;

jQuery(document).ready(function(b){var a=b("#w2bSocialFloat");a.wrap('<div id="w2bSocialPlaceholder"></div>').closest("#w2bSocialPlaceholder").height(a.outerHeight());a.width(a.outerWidth());e=a.offset().top-$theOffset;b("#w2bSocialFloat iframe[src*=plusone]").closest("div").css("max-width","82px");b(window).scroll(function(){d=b(this).scrollTop();d>=e?a.addClass("w2bFloatSocial"):a.removeClass("w2bFloatSocial");f=b(".post");if(f.length!=0){c=f.outerHeight()+f.offset().top;d>=c?a.stop().animate({top:"-150px"}):a.stop().animate({top:$theOffset+"px"})}else d>=e?a.css("top",$theOffset+"px"):a.css("top","0")})});
/*]]>*/
</script>
<script type="text/javascript" src="http://widgets.way2blogging.org/blogger-widgets/w2b-blogger-pinit.js"></script>
<script type="text/javascript">
/*<![CDATA[*/
    // Twitter
     (function(a,b,c){var d=a.getElementsByTagName(b)[0];if(!a.getElementById(c)){a=a.createElement(b);a.id=c;a.src="//platform.twitter.com/widgets.js";d.parentNode.insertBefore(a,d)}})(document,"script","twitter-wjs");
    // Google + (plus)
    (function(){var a=document.createElement("script");a.type="text/javascript";a.async=true;a.src="https://apis.google.com/js/plusone.js";var b=document.getElementsByTagName("script")[0];b.parentNode.insertBefore(a,b)})();

/*]]>*/
</script>
</b:if>
  • langkah selanjutnya cari kode dibawah ini, gunakan Ctrl+F :
<data:post.body/>
  • kemudian salin script dibawah ini tepat diatas <data:post.body/> :
<b:if cond='data:blog.pageType == &quot;item&quot;'>
<div class='horizontalsocial social-buttons' id='horizontalsocial'>
<div class='w2bSocialFloat' id='w2bSocialFloat'>
<table class='w2bSocialFloat' width='100%'>
    <tr>
<td><div class='sharertitle'>Socialize It &#8594;</div>
</td>
        <td>
            <div class='sharertwitter'><a class='twitter-share-button' expr:data-text='data:post.title' expr:data-url='data:post.url' href='https://twitter.com/share'>Tweet</a></div>
        </td>

        <td>
        <div class='fb-like'>    <iframe allowTransparency='true' expr:src='&quot;//www.facebook.com/plugins/like.php?href=&quot; + data:post.url + &quot;&amp;send=false&amp;layout=button_count&amp;width=80&amp;show_faces=false&amp;action=like&amp;colorscheme=light&amp;font&amp;height=21&quot;' frameborder='0' scrolling='no' style='border:none; overflow:hidden; width:80px; height:21px;'/></div>
        </td>
       
        <td>
        <div class='sharergplus'>    <div class='g-plusone' data-size='medium' expr:data-href='data:post.url'/></div>
        </td>
       
        <td>
<div class='sharerbubble'><span class='thecomments'>
<b:if cond='data:post.allowComments'>
<a class='comment-link' expr:href='data:post.addCommentUrl' expr:onclick='data:post.addCommentOnclick'><b:if cond='data:post.numComments == 1'>1 <b:else/><data:post.numComments/> </b:if></a>
</b:if>
</span></div>
</td>
    </tr>
</table>
</div></div>
</b:if>
  • Terakhir, klik Simpan template - selesai !


Tambahan :
Untuk menghilangkan fitur melayang, hapus script yang berwarna merah dan Anda juga bisa mengganti ikon komentar dengan ikon yang komentar yang Anda miliki cukup ganti link url yang berwarna kuning dengan link url ikon Anda.

Saya telah menambahkan Widget Horizontal Floating Share Bar ini diblog saya, bisa Anda lihat dibawah judul posting. Seperti biasa semoga artikel ini bermanfaat buat Anda semua dan bila Anda mengalami kesulitan tidak ada salahnya untuk berbagi dengan saya. Salam satu-delapan!


Tips Memilih KEYWORD POPULER dengan Mudah


Pencarian Keyword


Tips Memilih Keyword POPULER dengan Mudah


PENDAHULUAN

saya sekarang sudah kembali lagi beraktifitas dalam membuat posting di blog [ ARSIP ] ini. Sudah lama saya tidak membuat artikel dan alhamdulilah Allah mengizinkan saya kembali untuk membuat post lagi yang bertema kan tentang ' Mencari Keyword Populer dengan bantuan Situs Alexa '. Ko tema-nya unik ya ?

Multi Hover Effect On Blogger Images Using Pure CSS

Today I'm going to show you how to add an amazing mouseover effect for Blogger images using only CSS, in which moving your mouse over an image from different directions (from above, from below, etc) will cause an overlay transitioned in from the same vector. This trick will change not only the images appearance when moving mouse over them, but will also allow you to add inside a text with a description.

hover effect, mouseover, blogger hover effects

You can see the effect on this image below: try moving your mouse from the left, right, and above.

hover right hover top hover left hover bottom

Adding Hover Effect From Different Directions on Blogger Images

First thing to do is to add the CSS style to our Template:

Step 1. From Blogger Dashboard, go to Template and press the Edit HTML button


Step 2. Search for the </head> tag - to find it, click anywhere inside the code area, press CTRL + F keys and type it in the search box.


Step 3. After you found it, add the following style just above it: 
<style>
  /* The container and the image */
  div.multi-hover {
    overflow: hidden;
    position: relative;
    vertical-align: middle;
    width: 100%;
    height: 358px;
    line-height: 358px;
  }
  div.multi-hover img {width: 100%;}

/* The texts that, by default, are hidden */
  div.multi-hover span {
    color: #FFF;
    font-size: 32px;
    font-weight: bold;
    height: 100%;
    opacity: 0;
    position: absolute;
    text-align: center;
    transition: all 0.3s linear 0s;
    width: 100%;
  }

/* And this is what will generate the effect */
  div.multi-hover span:nth-child(1) { /* right */
    background: none repeat scroll 0 0 rgba(255, 189, 36, 0.6);
    left: 90%;
    top: 0;
  }
  div.multi-hover span:nth-child(2) { /* top */
    background: none repeat scroll 0 0 rgba(106, 170, 255, 0.6);
    left: 0;
    top: -80%;
  }
  div.multi-hover span:nth-child(3) { /* left */
    background: none repeat scroll 0 0 rgba(204, 87, 166, 0.6);
    left: -90%;
    top: 0;
  }
  div.multi-hover span:nth-child(4) { /* bottom */
    background: none repeat scroll 0 0  rgba(97, 181, 115, 0.6);
    left: 0;
    top: 80%;
  }

  div.multi-hover span:hover {opacity: 1;}
  div.multi-hover span:nth-child(2n+1):hover {left: 0;}
  div.multi-hover span:nth-child(2n):hover {top: 0;}

</style>
Step 4. Save the Template

Now we are going to add the HTML that is nothing but a DIV where we included four SPAN tags with texts and an image:

Step 5. Choose Posts, create a New Post, click on the HTML tab (1) and paste this code inside the empty box:
<div class=multi-hover>
  <span>hover right</span>
  <span>hover top</span>
  <span>hover left</span>
  <span>hover bottom</span>
  <img src="http://4.bp.blogspot.com/-iNaV2hPrI7Y/UaNY2q0ETiI/AAAAAAAADio/TjGwDktvlPQ/s1600/flowers">
</div>
Add your own text/description to "hover right", "hover top", "hover left" and "hover bottom" (2) and replace the url in blue with the image URL (3) where you want to apply the effect.

Important! Do not click on the Compose tab, otherwise the changes will be lost.


Step 6. After you finished editing your post, click Publish (4)

And that's it... enjoy! :)

Download E-Book tentang RegEx (Regular Expression)

Regular Expression atau biasa di singkat RegEx  biasa digunakan oleh saya untuk mencocokan suatu string ( data teks ) dengan pola yang telah saya atur. contoh untuk validasi input data Tanggal lahir dimana saya ingin input yang benar adalah DD-MM-YYYY yang artinya dapat diterima jika 20-07-1998 ( true ) dan akan False apabila pengguna mengetikkan 20-07-98 karena tidak sesuai dengan pola yang saya

Cara MenDaftar Google AdSense Terbaru 2013 - Blogger


Google AdSense


Cara MenDaftar Google AdSense Terbaru 2013


PENDAHULUAN DAFTAR GOOGLE ADSENSE


Sudah lama tidak membuat posting di blog ini, rasanya senang bisa menjadi penulis lagi. sekarang saya akan menulis dan mempublish sekaligus share tentang Cara Daftar Google AdSense Terbaru 2013 Melalui/dari/di Blogger. Sudah sangat jelas saya akan memberitahukan trik Daftar Google AdSense

Selasa, 28 Mei 2013

Download Alternatif Editor Windows Live Writer 2012 Untuk Blogger

satu-delapan-blogspot

Windows Live Writer adalah salah satu editor blog yang paling popular dan sangat cocok buat blogger, selain itu juga cocok buat WordPress, Sharepoint, TypePad dan lain-lain. Jika Anda belum memiliki Blog, Anda dapat membuatnya dari WLW atau Anda juga bisa menambah akun blog Anda. Saya sendiri sangat terbantu dengan menggunakan WLW untuk melakukan postingan, dengan memanfaatkan fitur yang ada seperti di blogger tapi lebih mudah untuk digunakan. Berikut beberapa fitur yang sudah saya rangkum :

 
satu-delapan-blogpsot

Fitur Windows Live Writer :

  • Mengubah ukuran gambar
  • Menambahkan Wtermark
  • Menambahkan teks/judul gambar
  • Menambahkan hyperlink untuk teks
  • Menambahkan hyperlink untuk gambar
  • Menambahkan Video Online
  • Menambahkan Peta Bing

Fitur lainnya dari Windows Live Writer :

  • Penghitung kata
  • Otomatis Spell check
  • Mencari kata atau kalimat
  • Mengatur tanggal posting
  • Edit, untuk menulis posting
  • Preview, untuk menunjukan posting akan terlihat seperti apa.
  • Source, untuk melakukan editan dalam bentuk HTML.
  • Kegunaan dari keseluruhan fitur WLW mirip dengan Microsoft Word.

Intinya saat kita menggunakan WLW sama halnya seperti kita menggunakan Microsoft Word jadi hal ini pasti tidak akan menyulitkan kita untuk menggunakan fitur yang ada. Anda akan merasakan sendiri kemudahannya saat menggunakan WLW dan recommended sekali buat Anda yang suka nge-blog. Setelah Anda mengetahui apa itu Windows Live Writer, langsung aja di download link dibawah ini.

 
Diatas Anda telah membaca salah satu Alternatif Editor Blogger yang popular dan akhir kata semoga posting ini bermanfaat buat Anda. Salam satu-delapan!


Cara Menghilangkan Link Pengeditan Cepat dan link kunci di Blogger

satu-delapan-blogspot
Saat melakukan pratinjau atau melihat blog Anda, pasti Anda akan melihat logo pengeditan cepat atau ikon pencil dan ikon obeng. kedua link tersebut akan membantu Anda untuk lebih mudah mengolah posting Anda atau gadget yang ada di blog Anda. Tetapi jika Anda merasa tidak nyaman atau ingin menghilangkanya dari blog Anda itu bisa lakukan dengan cara mudah di bawah ini.

Dengan menghapus link tersebut berarti Anda mengurangi jumlah link eksternal di Blog Anda dan juga membuat lebih Search Engine Friendly. Namun langkah dibawah hanya untuk menghilangkan bukan menghapusnya.


Artikel terkait :


Cara Menghilagkan Link Kunci Inggris dan Pengeditan Cepat

 
  • Login ke Blogger Anda
  • klik Tata Letak - pilih Posting Blog gadget klik Edit
  • Hapus tanda centang "Tunjukan pengeditan cepat" - Simpan

    satu-delapan-blogspot
  • Langkah selanjutnya klik Template - pilih Edit HTML
  • Cari kode di bawah ini, gunakan Ctrl-F untuk mencari :
<b:include name='quickedit'/>
  • Ganti semua kode diatas dengan dibawah ini :
<!--b:include name='quickedit'/-->
  • langkah terakhir Simpan Template dan lihat kembali halaman blog Anda.
 
Tambahan :
Jika Anda ingin mengembalikan kedua link pengeditan cepat diatas, Anda hanya perlu mengembalikan atau mengulang langkah yang telah Anda lakukan.

Cara diatas adalah untuk menghilangkan logo link Pengeditan cepat dan kunci inggris. Akhir kata semoga trik kecil ini bermanfaat buat Anda. Salam satu-delapan !


Senin, 27 Mei 2013

Download Template Gratis untuk Blogger - Luhur Fatah Style

Lama gk ngepost dan akhirnya memutuskan membuat artikel tentang Download Template Blogger setelah saya mengecek salah satu keyword yg berpengaruh pada sebuah situs sasaran saya dan saya menemukan tema ini yaitu [ Download Template ] ini. Template adalah hal yang tidak boleh dilewatkan, template pun termasuk dalam hal Search Engine Optimization [ SEO ]. mungkin ini bisa dibilang salah satu SEO

Minggu, 26 Mei 2013

How To Add Social Media Icons to Blogger Header

social media icons, facebook icons, social media icons for bloggerThis tutorial will help you to add social media icons in the top right corner of the page which could increases the likelihood that readers can follow through the various social networks. There are several ways to do this, like adding a new widget section to the blog header but now, we'll do it using an unordered list that uses icons of Facebook, Twitter, Google+ and blog feed, and as a bonus, the icons will rotate when you hover over them.

You can see a demo in this test blog.


Adding Social Media Icons to Blogger Header

Step 1. From your Blogger dashboard, go to Template and click on the Edit HTML button:

blogger blogspot, blogger template, blogger gadgets

Step 2. To expand the style, click on the small arrow on the left of <b:skin>...</b:skin> (screenshot 1), then click anywhere inside the code area to search (using CTRL + F) for the ]]></b:skin> tag (screenshot 2) and add this code just above it:

 /* Social icons for Blogger
----------------------------------------------- */

#social-icons {
margin-bottom:-30px;
height:50px;
width:100%;
display:block;
clear:both;
z-index: 2;
position: relative;
}
.social-media-icons {
display:table
}
.social-media-icons ul {
text-align:right;
padding:5px 5px 0 0
list-style-image:none;
list-style-position:outside;
list-style-type:none;
}
.social-media-icons ul {
margin-bottom:0;
padding:0;
float:right;
}
.social-media-icons li.media_icon {
margin-left:6px;
padding-left:0 !important;
background:none !important;
display:inline;
float:left;
}
.social-media-icons li:hover {
-moz-transform: rotate(360deg);
-webkit-transform: rotate(360deg);
-o-transform: rotate(360deg);
transform: rotate(-360deg);
-moz-transition: all 0.5s ease-in-out;
-webkit-transition: all 0.5s ease-in-out;
-o-transition: all 0.5s ease-in-out;
-ms-transition: all 0.5s ease-in-out;
transition: all 0.5s ease-in-out;
}

Screenshot 1:


Screenshot 2:


Step 3. Now search for this line

<b:section class='header' id='header' maxwidgets='1' showaddelement='no'>

Step 4. And just above it, add this code:

<div class='social-media-icons' id='social-icons'>
<ul>

<li class='media_icon'><a href='http://facebook.com/username'><img border='0' src='http://2.bp.blogspot.com/-hJlnVDP-uXk/UaKErpYECEI/AAAAAAAADhA/DA59rR8trrA/s1600/Facebook.png'/></a></li>

<li class='media_icon'><a href='http://twitter.com/#!/username'><img border='0' src='http://3.bp.blogspot.com/-x7YZ7aKIxM8/UaKErq0FZlI/AAAAAAAADhE/3zNd_IFPT8g/s1600/Twitter.png'/></a></li>

<li class='media_icon'><a href='https://plus.google.com/XXXXXXXXXXXXXXXXXX/about'><img border='0' src='http://1.bp.blogspot.com/-DNSrkD8pl14/UaKEsW_JdfI/AAAAAAAADhU/S0jGIdQuO4M/s1600/googleplus.png'/></a></li>

<li class='media_icon'><a href='http://name-of-your-blog.com/feeds/posts/default'><img border='0' src='http://2.bp.blogspot.com/-H3nOjhn9wk8/UaKErtM0_mI/AAAAAAAADg8/vJ8tEgRcl5M/s1600/RSS.png'/></a></li>

</ul></div>

Customization

- Change what's in red with your usernames and id: the first is your Facebook username, the second is that of Twitter, in the third you should change the X by the ID of your Google+ profile and in the fourth you will put the name of your blog.
- To change the icons, just replace the urls in blue with the ones of your images.
- You can add more icons if you want, you just have to add before </ul></div> a line like this for each extra icon you want:

<li class='media_icon'><a href='Link URL'><img border='0' src='Image URL'/></a></li>

Step 5. Finally, Save the Template to apply the changes.

The effect is done with CSS3, so this effect will not work in older browsers.

Cara Install Dan Menambah Google Analytics Di Blogger

satu-delapan-blogspot
Google Analytics adalah tool terbaik yang disediakan oleh Google, karena dengan mudah kita dapat melacak dan memeriksa statistik yang akurat dan real time atau nyata dari trafik blog Anda. Dan juga dapat memeriksa tingkat bouncing pada blog Anda, pengunjung unik, tampilan halaman dan juga kunjungan yang datang ke blog, dengan menambahkan Google Analytics di blog Anda. Selain itu, tool ini akan sangat membantu Anda dengan mengetahui apa yang terjadi di blog Anda dan juga perilaku dari pengunjung blog sehingga akan muncul suatu ide atau langkah yang tepat untuk meningkatkan lalu lintas di blog Anda. Ok, setelah Anda mengetahui apa itu Google Analytics, mari kita lanjutkan dengan menginstal atau menambah Google Analytics di blog Anda.

Artikel terkait :


Membuat Akun di Google Analytics


Sebelum Anda menambahkan Google Analytics ke blog Anda, yang harus Anda lakulan pertama kali membuat akun Google Analytics. Langkah-langkahnya sebagai berikut :
satu-delapan-blogspot
  • Klik Buat Akun
  • Selanjutnya Login pakai Akun Google atau akun Gmail Anda
satu-delapan-blogspot
  • Setelah muncul halaman seperti dibawah ini, klik Sign Up
satu-delapan-blogspot
  • Selanjutnya Anda akan diredirect ke halaman berikutnya, pada halaman ini Anda perlu memasukan beberapa informasi untuk profil Anda seperti nama website Anda, URL blog atau website Anda, kategori blog, timezone dan nama untuk akun blog Anda yang akan digunakan di Google Analytics, gunakanlah nama yang mudah untuk mengenali blog Anda.


  • Setelah Anda mengisi semua informasi yang dibutuhkan, Klik tombol Get Tracking ID
  • Akan muncul jendela baru, klik tombol I Accept untuk menyetujui ketentuan Google Analytics
satu-delapan-blogspot
  • Jika proses diatas berjalan lancar, maka Anda akan mendapatan ID Pelacakan seperti dibawah ini. Copy ID Pelacakan tersebut.
    satu-delapan-blogspot


Menambahkan Google Analytics ke Blogger


Untuk menambahkan Google Analytics di blog Anda, kita perlu melakukan 2 langkah. Pertama menambah ID Pelacakan di Pengaturan Blogger dan yang kedua menempatkan kode pelacakan pada template blog Anda. berikut langkah-langkahnya

Menambahkan Google Analytics di Pengaturan Blogger

  • Login ke Blogger Anda - klik Setelan - dan Pilih Lainnya
  • Sekarang Anda perhatikan pada kolom Google Analytics - masukan atau salin ID Pelacakan blog Anda pada kolom teks "ID Properti Web Analytics"
  • Klik tombol Simpan setelan di pojok kanan atas


Menambahkan ID Pelacakan di Template Blogger

  • klik Template - Edit HTML - cari </head> gunakan Ctrl+F untuk mencari
  • Setelah Anda menemukan kode diatas salin Script ID Pelacakan (lihat gambar ke-6 di atas yang ditandai dengan nomor 2), salin kode tersebut di atasnya.
  • Atau bisa dengan cara lain, dengan menambahkan kode include dibawah ini tepat di atas tag </body> :
<b:include data='blog' name='google-analytics'/>
  • Langkah terakhir klik Simpan template - selesai !

Setelah Anda menyelesaikan semua langkah instalansi dan menambahkan Google Analytics di blog Anda, dibutuhkan waktu sekitar 24 jam untuk mendapatkan laporan lalu lintas di Google Analytics Anda. Akhir kata semoga artikel ini bisa membantu Anda untuk meningkatkan lalu lintas blog Anda. Salam satu-delapan !


Sabtu, 25 Mei 2013

Fading Box With Newer/Older Posts Links and Titles for Blogger

The navigation links are those that appear at the bottom of the page that says "Older Posts", "Newer Posts" and "Home" and help us to move through the blog posts. This tutorial will show you how to change the word "Older Posts" and "Newer Posts" for post titles and make these to appear in a box "fading" when you scroll down the page.
blogger gadgets, navigation for blogger

You can see it in action on this demo blog - when you scroll down, the navigation links will appear showing the post titles for the older/newer entries.

This way to display the navigation links will be seen only in individual entries, while those on the homepage and other parts of the blog will still be displayed as usual.

How to Add Navigation Box with Newer & Older Posts on Blogger

Step 1. From your Blogger Dashboard, go to Template > Edit HTML, click anywhere inside the code area and search - using CTRL + F - for this line:

<b:include name='nextprev'/>

Screenshot:

Step 2. REPLACE the code above with this one:

<b:if cond='data:blog.pageType != &quot;item&quot;'>
<b:include name='nextprev'/>
</b:if>
<b:if cond='data:blog.pageType == &quot;item&quot;'>
<div id='blog-pager-box'>
<h4>Other posts published:</h4>
<b:include name='nextprev'/>
</div>
</b:if>

Note: you can change the "Other posts published" title with your own

Step 3. Now add just above </head> the following code:

<b:if cond='data:blog.pageType == &quot;item&quot;'>
<script src='http://ajax.googleapis.com/ajax/libs/jquery/1.8.2/jquery.min.js' type='text/javascript'/>
<script>
// <![CDATA[
$(function() {
$('#blog-pager-box').toggle()
.css({
width: '520px',
height: '150px',
position: 'fixed',
padding: '1em',
bottom: 0,
right: 0,
background: 'url(http://4.bp.blogspot.com/-2qUvFgMRqk4/UaD7GSA7C8I/AAAAAAAADbI/eh-qGOnAmeM/s1600/paper.jpg)'
});

$(window).scroll(function() {
if($(this).scrollTop() > 100) {
$('#blog-pager-box').fadeIn();
} else {
$('#blog-pager-box').fadeOut();
}
});
});
$(document).ready(function(){
var newerLink = $("a.blog-pager-newer-link").attr("href");
$("a.blog-pager-newer-link").load(newerLink+" .post-title:first", function() {
var newerLinkTitle = $("a.blog-pager-newer-link:first").text();
$(".blog-pager-newer-link").html("<div>Newer Posts:</div>" + newerLinkTitle);
});
var olderLink = $("a.blog-pager-older-link").attr("href");
$("a.blog-pager-older-link").load(olderLink+" .post-title:first", function() {
var olderLinkTitle = $("a.blog-pager-older-link").text();
$(".blog-pager-older-link").html("<div>Older Posts:</div>" + olderLinkTitle);
});
});
// ]]>
</script>

<style type='text/css'>
<!--
#blog-pager-box {
box-shadow: 0 0 3px #AEAEAE;
z-index:9;
}

#blog-pager-box h4 {
margin:0;
padding:0;
color:#4898B9; /* Widget's title color */
font-size:16px; /* Title font size */
}

#blog-pager-newer-link {float:left;clear:both;line-height:30px;}
#blog-pager-older-link {float:left;clear:both;line-height:30px;}
.home-link {display:none;}
.blog-pager-older-link, .blog-pager-newer-link {
background-color: transparent !important;
background-image: none !important;
border:0 !important;
color: #4B4B4B !important; /* Color of the links */
float: left;
width: 500px;
clear:both;
}

a.blog-pager-older-link:hover, a.blog-pager-newer-link:hover {
text-decoration:none !important;
}
 
a.blog-pager-newer-link:before {
content: url(http://1.bp.blogspot.com/-2hKXB7FANlI/UaD_wh_InyI/AAAAAAAADbs/S0H4hok2te0/s1600/back.png);
float:left;
}
a.blog-pager-older-link:before {
content: url(http://4.bp.blogspot.com/-VPxzgLQCgrM/UaD_tGXPfnI/AAAAAAAADbk/owLQci4BaYY/s1600/forward.png);
float:left;
}
#blog-pager {
width:500px;
background-color: transparent !important;
background-image: none !important;
border:0 !important;
text-align:left;
}
 
#blog-pager div {
color:#0577AB; /* Color for the "Newer Posts" and "Older Posts" text */
font-weight:bold;
margin-bottom: -5px;
}
a#blog-pager div:hover {
text-decoration:none !important;
color:#4898B9; /* Color for the "Newer Posts" and "Older Posts" text */
}
-->
</style>
</b:if>

Note that this gadget uses jQuery, so try to have only one version.


Customization:


- There are three URLs in blue, the first is the paper background image for the box, the other two are the icons that correspond to the arrows. You can replace these with your own.
- In green you can see where to change the text colors.
- The red number is the distance in pixels that activates the gadget, this means that the box will appear when you scroll down the 100px. You can use a higher value if your posts are usually long and therefore the "height" of the scroll is greater.

Step 4. Now, Save the Template and that's it!

You can also change the "Older Posts" and "Newer Posts" links with posts titles or images.

Jumat, 24 Mei 2013

New Blogger Widget: Contact form - Change Style & Install in a Static Page

Just a few days ago, Blogger introduced a new widget. It is about a contact form that you can add to your blog easily. It is very basic, because - at least for now, does not permit incorporating files or send anything other than plain text.

The contact form for Blogger has the following features:
  • Field for the user name
  • Field for email
  • Field for the message (textarea)
  • Submit Button
Screenshot
contact form, blogger gadgets, static page
 The design is simple and the text colors inherit the section where you add it. At the moment, this widget has no configuration options and is not available for dynamic views.

How to Add Contact Form to Blogger

To add it to your blog, just select the Layout tab, then click on Add a gadget in the section you want to show, for example, in the sidebar. Then, select the More gadgets tab and add the Contact Form gadget.


blogger gadgets, blogger widgets, contact form

Styling Contact Form


As the background is transparent, the form will integrate well, aesthetically speaking, but nevertheless it is easy to modify using Style Sheets (CSS) to the appropriate selectors. Here's an example:

/* Contact Form Container */
.contact-form-widget {
width: 500px;
max-width: 100%;
margin: 0 auto;
padding: 10px;
background: #F8F8F8;
color: #000;
border: 1px solid #C1C1C1;
box-shadow: 0 1px 4px rgba(0, 0, 0, 0.25);
border-radius: 10px;
}

/* Fields and submit button */
.contact-form-name, .contact-form-email, .contact-form-email-message {
width: 100%;
max-width: 100%;
margin-bottom: 10px;
}

/* Submit button style */
.contact-form-button-submit {
border-color: #C1C1C1;
background: #E3E3E3;
color: #585858;
width: 20%;
max-width: 20%;
margin-bottom: 10px;
}

/* Submit button on mouseover */
.contact-form-button-submit:hover{
background: #4C8EF9;
color: #ffffff;
border: 1px solid #FAFAFA;
}

This is how it will look like after applying the style:
contact form, blogger gadgets, contact form for blogger

To add this style, go to Template > Edit HTML, click on the sideways arrow next to <b:skin>...</b:skin> and paste the code just above ]]></b:skin> (press CTRL + F to find it):


How To Add Contact Form In A Static Page


First step is to add the Contact Form gadget (Layout) and second, to edit the template (Template > Edit HTML) to remove most of the gadget. You have to search for the id "ContactForm", expand the widget by clicking on the black arrow on the left (same with the includable) and then delete the part that I have colored in red (see below):

Part to be removed:

  <b:widget id='ContactForm1' locked='false' title='Contact Form' type='ContactForm'>
    <b:includable id='main'>
  <b:if cond='data:title != &quot;&quot;'>
    <h2 class='title'><data:title/></h2>
  </b:if>
  <div class='contact-form-widget'>
    <div class='form'>
      <form name='contact-form'>
        <p/>
        <data:contactFormNameMsg/>
        <br/>
        <input class='contact-form-name' expr:id='data:widget.instanceId + &quot;_contact-form-name&quot;' name='name' size='30' type='text' value=''/>
        <p/>
        <data:contactFormEmailMsg/> <span style='font-weight: bolder;'>*</span>
        <br/>
        <input class='contact-form-email' expr:id='data:widget.instanceId + &quot;_contact-form-email&quot;' name='email' size='30' type='text' value=''/>
        <p/>
        <data:contactFormMessageMsg/> <span style='font-weight: bolder;'>*</span>
        <br/>
        <textarea class='contact-form-email-message' cols='25' expr:id='data:widget.instanceId + &quot;_contact-form-email-message&quot;' name='email-message' rows='5'/>
        <p/>
        <input class='contact-form-button contact-form-button-submit' expr:id='data:widget.instanceId + &quot;_contact-form-submit&quot;' expr:value='data:contactFormSendMsg' type='button'/>
        <p/>
        <div style='text-align: center; max-width: 222px; width: 100%'>
          <p class='contact-form-error-message' expr:id='data:widget.instanceId + &quot;_contact-form-error-message&quot;'/>
          <p class='contact-form-success-message' expr:id='data:widget.instanceId + &quot;_contact-form-success-message&quot;'/>
        </div>
      </form>
    </div>
  </div>
  <b:include name='quickedit'/>

</b:includable>
  </b:widget>

After you have saved the template, go to Pages and paste the following code into a new blank page with the title you want:

 <div class='widget ContactForm' id='ContactForm1'>
  <div class='contact-form-widget'>
    <div class='form'>
      <form name='contact-form'>
        <p>Name<p>
        <input class='contact-form-name' id='ContactForm1_contact-form-name' name='name' size='30' type='text' value=''/>
        <p>E-mail *</p>
        <input class='contact-form-email' id='ContactForm1_contact-form-email' name='email' size='30' type='text' value=''/>
        <p>Message *</p>
        <textarea class='contact-form-email-message' cols='25' id='ContactForm1_contact-form-email-message' name='email-message' rows='5'></textarea>
        <input class='contact-form-button contact-form-button-submit' id='ContactForm1_contact-form-submit' type='button' value='Submit'/>
        <p class='contact-form-error-message' id='ContactForm1_contact-form-error-message'></p>
        <p class='contact-form-success-message' id='ContactForm1_contact-form-success-message'></p>
      </form>
    </div>
  </div>
</div>

Messages will be sent to the same email that you have registered in Blogger.

Here's a demo page where you can test it (it is an account that I don't use, so don't expect reply).


That's it! If you have any questions or comments please post below.

10 Template Blogger Premium Gratis Dan Keren

Di bawah ini adalah 10 Template Blogger Premium Free Yang Keren, yang bisa Anda download secara gratis dengan desain template yang keren dan kreatif. Dari beberapa Template di bawah ini merupakan yang terpopuler dan sering dicari oleh pengguna Blogger dan juga ini free untuk Anda download. 


Artikel Terkait :


10 Template Blogger Premium Free Keren :


  • Download Boulevard 
satu-delapan-blogspot


  • Download Videobox
satu-delapan-blogspot


  • Download Timeline
sau-delapan-blogspot


  • Download Simplex Orgmag 
satu-delapan-blogspot


  •  Download Sinjai
satu-delapan-blogspot


  • Download Sandal Jepit
satu-delapan-blogspot


  • Download Grid Spot 
satu-delapan-blogspot


  •  Download Point Of View
satu-delapan-blogspot 

  • Download Quickly
satu-delapan-blogspot


  •  Download Mono
satu-delapan-blogspot


Catatan :
Sebelum Anda meneraptkan temlate di atas, terlebih dahulu untuk backup template Anda.

Itu lah 10 Template Blogger Premium Gratis yang bisa saya bagikan kepada Anda semua. Jika Anda menyukai postingan ini presentasikan lah dengan memberi 1+ atau like. Ok...salam satu-delapan !


Membuat Widget Media Sosial Advanced Di Sidebar Blogger


satu-delapan-blogspot


Widget Media Sosial Advanced akan membuat blog Anda terlihat profesional dengan widget berlangganan di siderbar yang akan menghubungkan blog atau website Anda ke semua jejaring sosial populer seperti Facebook, Twitter, Delicious, Pinterest, LinkedIn, StumbleUpon dan juga terdapat Email berlangganan melalui Feedburner.

Wdiget sosial ini sangat direkomendasi buat blog atau website Anda, selain tampilannya yang bagus didukung juga dengan fungsi utamanya yang akan memudahkan Pembaca atau pengunjung blog Anda untuk Follow atau berlangganan untuk Feedburner. 


                                                                      LIVE DEMO


Artikel yang terkait : 


Langkah-langkah Membuat Advanced Social Media :


  • Login ke Blogger Anda
  • Pilih Tata Letak - Tambahkan gadget
  • Pilih HTML/Javascript
  • Kemudian salin kode di bawah ini :

<style>
div#advancedsocialwidget,div#advancedsocialwidget ul,div#advancedsocialwidget ul li,div#advancedsocialwidget ul li img,div#advancedsocialwidget ul li span,#advancedsocialwidget ul li a{background:none;border:none;margin:0;padding:0}
div#advancedsocialwidget{font-family:inherit;background:#fefefe url() repeat-x;width:100%;border:1px solid #ddd!important;font-size:90%;-moz-border-radius:5px;-webkit-border-radius:5px;border-radius:5px;margin:0 0 10px!important;padding:5px 2px 18px!important}
div#advancedsocialwidget h3{font-size:inherit;text-shadow:0 1px 0 rgba(255,255,255,.5);margin:0!important;padding:2px 0 5px 10px !important}
#newsletter{text-align:center;margin:0 auto 10px!important;padding:0!important}
.newsletter input{-moz-border-radius-topleft:3px!important;-moz-border-radius-topright:0!important;-webkit-border-top-left-radius:3px!important;-webkit-border-top-right-radius:0!important;-moz-border-radius-bottomleft:3px!important;-moz-border-radius-bottomright:0!important;-webkit-border-bottom-left-radius:3px!important;-webkit-border-bottom-right-radius:0!important;-webkit-font-smoothing:antialiased;-webkit-box-shadow:0 0 1px rgba(0,0,0,0.3), 0 1px 0 rgba(255,255,255,0.1) inset;-moz-box-shadow:0 0 1px rgba(0,0,0,0.3), 0 1px 0 rgba(255,255,255,0.1) inset;box-shadow:0 0 1px rgba(0,0,0,0.3), 0 1px 0 rgba(255,255,255,0.1) inset;background:0 color-stop(.25,#FFF));filter:progid:DXImageTransform.Microsoft.gradient(startColorStr='#EEEEEE',EndColorStr='#FFFFFF');-ms-filter:"progid:DXImageTransform.Microsoft.gradient(startColorStr='#EEEEEE', EndColorStr='#FFFFFF')";border:1px solid #CCC;color:#666!important;height:18px!important;font-size:11px!important;line-height:18px!important;vertical-align:top;margin:5px 0 0!important;padding:4px!important}
.newsletter input:focus,.newsletter input:active{background:#fafafa}
.newsletter button{vertical-align:top;height:28px!important;line-height:18px!important;text-align:left;width:auto;-moz-border-radius-topright:3px!important;-moz-border-radius-topleft:0!important;-webkit-border-top-right-radius:3px!important;-webkit-border-top-left-radius:0!important;-moz-border-radius-bottomright:3px!important;-moz-border-radius-bottomleft:0!important;-webkit-border-bottom-right-radius:3px!important;-webkit-border-bottom-left-radius:0!important;background:#4b88a0;background-image:0;-moz-box-shadow:0 0 1px rgba(0,0,0,0.3), 0 1px 0 rgba(255,255,255,0.3) inset;-webkit-box-shadow:0 0 1px rgba(0,0,0,0.3), 0 1px 0 rgba(255,255,255,0.3) inset;box-shadow:0 0 1px rgba(0,0,0,0.3), 0 1px 0 rgba(255,255,255,0.3) inset;font:bold 11px Arial, Helvetica!important;color:#fff;text-transform:uppercase;cursor:pointer;text-shadow:0 1px 0 rgba(0,0,0,.2);border-color:#75a1b2 #4b88a0 #38677a;border-style:solid;border-width:1px;margin:5px 0 0!important;padding:4px!important}
.newsletter button:hover{background:#75a1b2;background-image:0;cursor:pointer}
.newsletter button:active{background:#89C9E2;outline:none;-moz-box-shadow:0 1px 4px rgba(0,0,0,0.5) inset;-webkit-box-shadow:0 1px 4px rgba(0,0,0,0.5) inset;box-shadow:0 1px 4px rgba(0,0,0,0.5) inset}
div#advancedsocialwidget .textwidget img{border:0}
div#advancedsocialwidget .textwidget .tfsubscribelink{text-align:center!important;position:relative;margin:5px auto!important}
div#advancedsocialwidget .textwidget .rssicon{width:21px;height:21px;background:url(http://1.bp.blogspot.com/-A5hAEBDCeiM/T_A5Dnf0kOI/AAAAAAAABoI/3S_6kfE7R5E/s1600/advsoc_widget_main_24.png) no-repeat -176px 0;margin-bottom:30px;padding:5px 20px 7px 0}
div#advancedsocialwidget .textwidget .rssicon a,div#advancedsocialwidget .textwidget .rssicon a:hover{text-decoration:none}
div#advancedsocialwidget .textwidget .socialfollow{text-align:center;width:245px;margin:10px auto}
div#advancedsocialwidget .textwidget .rsssubscribelink{display:block;text-align:center;margin:0 auto 5px;padding:0}
div#advancedsocialwidget .textwidget a.rsslink{text-decoration:none;font-weight:700!important;font-family:inherit}
div#advancedsocialwidget .textwidget a.rsslink:hover{text-decoration:underline}
div#social_icons{float:left;width:100%;background:#fff;position:relative}
div#social_icons ul{clear:left;float:left;list-style:none;position:relative;left:50%;text-align:center;margin:0!important;padding:0!important}
div#social_icons ul li{display:block;float:left;list-style:none;position:relative;right:50%;margin:0 0 0 1px !important;padding:3px 10px!important}
div#social_icons ul li span{display:block;color:#444!important;font-size:8px;border:none;padding:40px 0 2px!important}
div#social_icons ul li:first-child span{margin-left:-2px}
div#social_icons ul li:last-child span{margin-left:-10px}
div#social_icons .subscribe_delicious a{width:24px;height:24px;text-decoration:none;display:block;background:url(http://1.bp.blogspot.com/-A5hAEBDCeiM/T_A5Dnf0kOI/AAAAAAAABoI/3S_6kfE7R5E/s1600/advsoc_widget_main_24.png) no-repeat -76px 0;font-family:inherit;color:inherit}
div#social_icons .subscribe_twitter a{width:24px;height:24px;text-decoration:none;display:block;background:url(http://1.bp.blogspot.com/-A5hAEBDCeiM/T_A5Dnf0kOI/AAAAAAAABoI/3S_6kfE7R5E/s1600/advsoc_widget_main_24.png) no-repeat 0 0;font-family:inherit;color:inherit}
div#social_icons .subscribe_stumbleupon a{width:24px;height:24px;text-decoration:none;display:block;background:url(http://1.bp.blogspot.com/-A5hAEBDCeiM/T_A5Dnf0kOI/AAAAAAAABoI/3S_6kfE7R5E/s1600/advsoc_widget_main_24.png) no-repeat -101px 0;font-family:inherit;color:inherit}
div#social_icons .subscribe_google a{width:24px;height:24px;text-decoration:none;display:block;background:url(http://1.bp.blogspot.com/-A5hAEBDCeiM/T_A5Dnf0kOI/AAAAAAAABoI/3S_6kfE7R5E/s1600/advsoc_widget_main_24.png) no-repeat -50px 0;font-family:inherit;color:inherit}
div#social_icons .subscribe_facebook a{width:24px;height:24px;text-decoration:none;display:block;background:url(http://1.bp.blogspot.com/-A5hAEBDCeiM/T_A5Dnf0kOI/AAAAAAAABoI/3S_6kfE7R5E/s1600/advsoc_widget_main_24.png) no-repeat -25px 0;font-family:inherit;color:inherit}
div#social_icons .subscribe_pinterest a{width:24px;height:24px;text-decoration:none;display:block;background:url(http://1.bp.blogspot.com/-A5hAEBDCeiM/T_A5Dnf0kOI/AAAAAAAABoI/3S_6kfE7R5E/s1600/advsoc_widget_main_24.png) no-repeat -126px 0;font-family:inherit;color:inherit}
div#social_icons .subscribe_linkedin a{width:24px;height:24px;text-decoration:none;display:block;background:url(http://1.bp.blogspot.com/-A5hAEBDCeiM/T_A5Dnf0kOI/AAAAAAAABoI/3S_6kfE7R5E/s1600/advsoc_widget_main_24.png) no-repeat -151px 0;font-family:inherit;color:inherit}
.tipsy{font-size:10px;opacity:0.8;filter:alpha(opacity=80);background-repeat:no-repeat;background-image:url(../images/tipsy.gif);padding:5px}
.tipsy-inner{background-color:#000;color:#FFF;max-width:200px;text-align:center;-moz-border-radius:3px;-webkit-border-radius:3px;padding:5px 8px 4px}
.tipsy-north{background-position:top center}
.tipsy-south{background-position:bottom center}
.tipsy-east{background-position:right center}
.tipsy-west{background-position:left center}
.clear{clear:both}
</style>
<div id="advancedsocialwidget" style="width:270px !important">
<h3>Subscribe for latest updates</h3>
<div class="textwidget">
<div id="newsletter">
<form action="http://feedburner.google.com/fb/a/mailverify" class="newsletter" method="post" target="popupwindow" onsubmit="window.open('http://feedburner.google.com/fb/a/mailverify?uri=wpinsite', 'popupwindow', 'scrollbars=yes,width=550,height=520');return true">
<input type="hidden" name="uri" value="ID-FEEDBURNER-ANDA" />
<input type="hidden" name="loc" value="en_US" />
<input name="email" id="newsletter-text" type="text" maxlength="100" style="width:160px !important" value="" class="" /><button type="submit" id="newsletter-button">Subscribe</button>
</form>
</div><!-- End newsletter -->
<div class="rsssubscribelink">
<a title="Subscribe to RSS Feed" href="http://feeds.feedburner.com/wpinsite" class="rssicon"></a> &nbsp;<a class="rsslink" href="http://feeds.feedburner.com/ID-FEEDBURNER-ANDA">Subscribe to RSS Feed</a>
</div>
<div class="socialfollow">
<div id="___plusone_0" style="height: 20px; width: 90px; display: inline-block; text-indent: 0px; margin-top: 0px; margin-right: 0px; margin-bottom: 0px; margin-left: 0px; padding-top: 0px; padding-right: 0px; padding-bottom: 0px; padding-left: 0px; background-image: initial; background-attachment: initial; background-origin: initial; background-clip: initial; background-color: transparent; border-top-style: none; border-right-style: none; border-bottom-style: none; border-left-style: none; float: none; line-height: normal; font-size: 1px; vertical-align: baseline; background-position: initial initial; background-repeat: initial initial; "><iframe allowtransparency="true" frameborder="0" hspace="0" marginheight="0" marginwidth="0" scrolling="no" style="margin-top: 0px; margin-right: 0px; margin-bottom: 0px; margin-left: 0px; border-top-style: none; border-right-style: none; border-bottom-style: none; border-left-style: none; height: 20px; width: 90px; position: static; left: 0px; top: 0px; visibility: visible; " tabindex="0" vspace="0" width="100%" id="I0_1341141889671" name="I0_1341141889671" src="https://plusone.google.com/_/+1/fastbutton?bsv=pr&amp;url=http%3A%2F%2Fwww.URL-WEBSITE-ANDA.com%2F&amp;size=medium&amp;count=true&amp;origin=http%3A%2F%2Fwww.wpinsite.com&amp;hl=en-US&amp;jsh=m%3B%2F_%2Fapps-static%2F_%2Fjs%2Fgapi%2F__features__%2Frt%3Dj%2Fver%3DVZZqGbh13DI.en_GB.%2Fsv%3D1%2Fam%3D!0Tt3uNrLr0Coc6egjA%2Fd%3D1%2Frs%3DAItRSTNEDiY6r3yiw7M_70-BLTWIV1YUXw#_methods=onPlusOne%2C_ready%2C_close%2C_open%2C_resizeMe%2C_renderstart&amp;id=I0_1341141889671&amp;parent=http%3A%2F%2Fwww.wpinsite.com" title="+1"></iframe></div> <iframe src="http://www.facebook.com/plugins/like.php?href=http://www.facebook.com/ID-FACEBOOK-ANDA&amp;layout=button_count&amp;show_faces=false&amp;width=40&amp;action=like&amp;font=&amp;colorscheme=light&amp;height=20" scrolling="no" frameborder="0" style="border:none; overflow:hidden; width:90px; height:20px;" allowtransparency="true"></iframe> <div class="tfsubscribelink">
<iframe allowtransparency="true" frameborder="0" scrolling="no" src="http://platform.twitter.com/widgets/follow_button.1340179658.html#_=1341141886240&amp;id=twitter-widget-12&amp;lang=en&amp;screen_name=ID-TWITTER-ANDA&amp;show_count=true&amp;show_screen_name=true&amp;size=m" class="twitter-follow-button" style="width: 95%; height: 20px; " title="Twitter Follow Button"></iframe>
<script>!function(d,s,id){var js,fjs=d.getElementsByTagName(s)[0];if(!d.getElementById(id)){js=d.createElement(s);js.id=id;js.src="http://platform.twitter.com/widgets.js";fjs.parentNode.insertBefore(js,fjs);}}(document,"script","twitter-wjs");</script>
</div>
</div>
<div class="clear" style="margin-bottom:5px;"></div>
<div id="social_icons">
<ul>
<li class="subscribe_delicious" style="padding:0 4px !important"><a id="subscribe_delicious" href="http://delicious.com/post?url=http%3A%2F%2Fwww.URL-WEBSITE-ANDA.com&amp;title=WPInsite" class="fade" target="_blank" style="opacity: 1; " original-title="Bookmark WPInsite on Delicious"></a></li>
<li class="subscribe_twitter" style="padding:0 4px !important"><a id="subscribe_twitter" href="http://twitter.com/ID-TWITTER-ANDA" class="fade" target="_blank" style="opacity: 1; " original-title="Follow wpinsite on Twitter"></a></li>
<li class="subscribe_facebook" style="padding:0 4px !important"><a id="subscribe_facebook" href="http://www.facebook.com/ID-FACEBOOK-ANDA" class="fade" target="_blank" style="opacity: 1; " original-title="Visit the WPInsite Facebook Page"></a></li>
<li class="subscribe_google" style="padding:0 4px !important"><a id="subscribe_google" href="https://plus.google.com/u/1/ID-GOOGLE-PLUS-ANDA" class="fade" target="_blank" style="opacity: 1; " original-title="Visit the WPInsite Google+ Page"></a></li>
<li class="subscribe_stumbleupon" style="padding:0 4px !important"><a id="subscribe_stumbleupon" href="http://www.stumbleupon.com/submit?title=WPInsite&amp;url=http%3A%2F%2Fwww.URL-WEBSITE-ANDA.com" class="fade" target="_blank" style="opacity: 1; " original-title="Recommend WPInsite on StumbleUpon"></a></li>
<li class="subscribe_pinterest" style="padding:0 4px !important"><a id="subscribe_pinterest" href="http://www.pinterest.com/ID-PINTEREST-ANDA" class="fade" target="_blank" style="opacity: 1; " original-title="Follow me on Pinterest"></a></li>
<li class="subscribe_linkedin" style="padding:0 4px !important"><a id="subscribe_linkedin" href="http://www.linkedin.com/shareArticle?mini=true&amp;url=http%3A%2F%2Fwww.URL-WEBSITE-ANDA.com" class="fade" target="_blank" style="opacity: 1; " original-title="Submit post to LinkedIn"></a></li>
</ul>
</div>
</div>
<div class="clear"></div>
<div class="clear" style="margin-bottom:10px;"></div>
<div style="margin:auto; text-align:center; margin-bottom:0 !important; padding-bottom:0 !important"><a href="
http://satu-delapan.blogspot.com/search/label/Tips%20Blog
">Get this widget</a></div>
</div>


Catatan :
Ganti script warna merah dengan ID-SOSIAL-ANDA
 
Demikin yang bisa saya berbagi pada kesempatan kali ini, dengan menambahkan widget sosial media advanced ke blogger Anda itu akan lebih baik. Dan akhir kata semoga artikel ini bermanfaat buat Anda semua. salam satu-delapan !


Download +350 Sosbok Dofollow - Mencari Backlink Gratis

  Cara Mendapatkan Backlink Gratis - Backlink seperti nya saya tidak ada habis - habis nya membahas tentang kata tersebut. Backlink jika di terjemahkan kedalam bahasa indonesia artinya Tautan Balik dimana sebuah link yang menggunakan tag Dofollow yang tertanam di sebuah situs yang mengarah ke situs kita baik ke homepage, artikel, ataupun halaman statis. Blogger manapun didunia pasti mengenal

Rabu, 22 Mei 2013

Membuat Stickybar Dengan Tombol Sosial Di Blogger


Pada postingan kali ini kita akan membuat bar melayang simple atau Stickybar di blogger dengan media sosial facebook dan Google+ yang akan tampil disemua halaman blog. Stickybar sangat simple dan mudah untuk Anda edit dan juga bagus untuk Anda yang ingin menambah sebuah pesan singkat berupa iklan atau link rujukan. Selain itu stickybar ini dilengkapi dengan tombol follow atau like untuk facebook dan google plus.
 

Artikel yang terkait :
Cara Membuat Horizontal Floating Share Sosial di Blogger


Untuk menambahkan Stickybar di blog Anda ikuti langkah-langkah di bawah ini.

  • Login ke Blogger Anda
  • Klik Template - Pilih Edit HTML
  • Cari kode di bawah ini, gunakan Ctrl+F untuk mencari :

]]></b:skin>

  • Selanjutnya tambahkan kode CSS di bawah ini tepat di atasnya :

#satudelapan_bar{ background:#a7a7ab url('http://1.bp.blogspot.com/-Da3j_tIh5vI/UZ0p9tSaPEI/AAAAAAAABC8/eLt_kQWMUyw/s1600/stickybar-satudelapan.png') repeat-x;
width:100%;
margin:0 auto;
text-align:center;
padding:3px 0 0 0;
border-bottom: 1px solid #888888;
-moz-box-shadow: #666666 0px 1px 3px;
-webkit-box-shadow: #666666 0px 1px 3px;
box-shadow: #666666 0px 1px 3px;
z-index: 999;
height: 28px; position:fixed;
line-height: 1.85em;
vertical-align: baseline;
letter-spacing: 1px;
color:#fff;
font-size:12px;
font-weight:bold;
font-family: arial,"Helvetica",sans-serif;
}
#satudelapan_bar a{
text-decoration:underline;
color:#E2E504;
}
#satudelapan_bar a:hover{
text-decoration:none;
}
#satudelapan_bar p {margin:0; list-style:none;}
#satudelapan_bar img {vertical-align: middle;
margin-right: 6px}

  • Berikutnya cari kode </head> dan tambahkan kode javascript dibwah ini tepat dibawahnya : 

<script type='text/javascript'>
//<![CDATA[
var satudelapan_arr = new Array();
var satudelapan_clear = new Array();
function mbtFloat(satudelapan) {
satudelapan_arr[mbt_arr.length] = this;
var satudelapanpointer = eval(satudelapan_arr.length-1);
this.pagetop = 0;
this.cmode = (document.compatMode && document.compatMode!="BackCompat") ? document.documentElement : document.body;
this.satudelapansrc = document.all? document.all[satudelapan] : document.getElementById(satudelapan);
this.satudelapansrc.height = this.satudelapansrc.offsetHeight;
this.satudelapanheight = this.cmode.clientHeight;
this.satudelapanoffset = satudelapanGetOffsetY(satudelapan_arr[satudelapanpointer]);
var satudelapanbar = 'satudelapan_clear['+satudelapanpointer+'] = setInterval("satudelapanFloatInit(satudelapan_arr['+satudelapansatudelapanpointer+'])",1);';
satudelapanbar = satudelapanbar;
eval(satudelapanbar);
}
function mbtGetOffsetY(satudelapan) {
var mtaTotOffset = parseInt(satudelapan.satudelapansrc.offsetTop);
var parentOffset = satudelapan.satudelapansrc.offsetParent;
while ( parentOffset != null ) {
satudelapanTotOffset += parentOffset.offsetTop;
parentOffset = parentOffset.offsetParent;
}
return satudelapanTotOffset;
}
function satudelapanFloatInit(satudelapan) {
satudelapan.pagetop = satudelapan.cmode.scrollTop;
satudelapan.mbtsrc.style.top = satudelapan.pagetop - satudelapan.mbtoffset + "px";
}
function closeTopAds() {
document.getElementById("satudelapan_bar").style.visibility = "hidden";
}
//]]>
</script>


  • Setelah itu cari tag <body> dan tambahkan kode HTML dibawah ini tepat di bawahnya :

<div id='satudelapan_bar'> <span style='padding-right:5px; float:right'></span><div style='float:left; padding-left:10px;'>www.satu-delapan.blogspot.com</div> <div style='float:right; padding-right:0px;'> <p style='font:bold 12px arial; float:left; margin:5px;'>Liked us?</p><iframe allowTransparency='true' frameborder='0' scrolling='no' src='http://www.facebook.com/plugins/like.php?href=https%3A%2F%2Fwww.facebook.com%2FSatudelapan&amp;send=false&amp;layout=button_count&amp;width=80&amp; show_faces=false&amp;action=like&amp;colorscheme=light&amp;font&amp;height=21' style='border:none; overflow:hidden; width:80px; height:21px;'/> <g:plusone href='http://satu-delapan.blogspot.com/' size='medium'/> </div> </div>


  • Terakhir, Simpan template dan lihat hasilnya.

Tambahan :

  • Ganti http://satu-delapan.blogspot.com/ dengan nama blog Anda
  • Ganti Satudelapan dengan nama fan page facebook Anda.
  • Untuk meletakan stickybar di bagian footer atau dibawah tambahkan kode css bottom:0; didalam baris tag #satudelapan_bar
  • Untuk merubah warna dari Stickybar ganti kode css a7a7ab ,berikut beberapa contoh warna yang mungkin Anda suka :


satu-delapan-blogspot

 Kode Warna : 3340f0

satu-delapan-blogspot

 Kode Warna : 3c3f42

satu-delapan-blogspot

 Kode Warna : c51616


Dengan menyelesaikan langkah di atas Anda telah berhasil manambahkan Stickybar dengan tombol sosial di Blogger Anda. jika Anda mengalami kesulitan Anda bisa meninggalakan kometar Anda. Da akhir kata semoga postingan ini bermanfaat buat Anda. Salam satu-delapan!