Tampilkan postingan dengan label jquery. Tampilkan semua postingan

Kamis, 19 September 2013

Adding a Youtube Video in the Background of a Blogger blog

Some of you might have wondered how to put a video to play in the blog's background, so that instead of having just a color or an image, to have a video. We can do this thanks to the jQuery plugin Tubular that lets you use a YouTube video as a background of a web page.

Although the result can be very original and attractive, I must say it has three drawbacks: they can not be silenced, if the video has ads, they will also appear, and it can slow the loading time of the blog, so if anyone wants to use it, may consider putting it only on special occasions, or on blogs that load very quickly.

Also it can be done in HTML5, the problem with this method is that you need to load the video in 3 different formats (.mp4, .webm and .ovg) along with a picture for browsers that do not support them, so this YouTube option seems more practical to me, despite the drawbacks.

blogger gadgets, blogger tricks, blogger widgets

You can see it working on this demo blog

Steps 

1. The first step is to just above the </head> tag, this script:
<script src='http://ajax.googleapis.com/ajax/libs/jquery/1.10.2/jquery.min.js' type='text/javascript'/>

<script type='text/javascript'>
//<![CDATA[
/* jQuery tubular plugin
|* by Sean McCambridge
|* http://www.seanmccambridge.com/tubular
|* Copyright 2012
|* licensed under the MIT License
|* Enjoy.
|*
|* Thanks,
|* Sean */

var videoWidth = 853;
var videoRatio = 16/9;
var defaultDiv = 'wrapper-video';

jQuery.fn.tubular = function(videoId,wrapperId) {
wrapperId = (typeof(wrapperId) == undefined) ? 'wrapper-video' : wrapperId;
t = setTimeout("resizePlayer()",1000);

jQuery('html,body').css('height','100%');
jQuery('body').prepend('<div id="yt-container" style="overflow: hidden; position: fixed; z-index: 1;"><div id="ytapiplayer">You need Flash player 8+ and JavaScript enabled to view this video.</div></div><div id="video-cover" style="position: fixed; width: 100%; height: 100%; z-index: 2;"></div>');
jQuery('#' + wrapperId).css({position: 'relative', 'z-index': 99});

var ytplayer = 0;
var pageWidth = 0;
var pageHeight = 0;
var videoHeight = videoWidth / videoRatio;
var duration;

var iframe = '<iframe id="myytplayer" width="' + videoWidth + '" height="' + videoHeight + '" src="http://www.youtube.com/embed/' + videoId + '?autoplay=1&controls=0&modestbranding=1&showinfo=0&hd=1&iv_load_policy=3&version=3&wmode=transparent&loop=1&playlist=' + videoId + '" frameborder="0" allowfullscreen></iframe>';

jQuery('#ytapiplayer').html(iframe);
jQuery(window).resize(function() {
resizePlayer();
});
return this;
}

function onYouTubePlayerReady(playerId) {
ytplayer = document.getElementById("myytplayer");
ytplayer.setPlaybackQuality('medium');
ytplayer.mute();
}

function resizePlayer() {
var newWidth = jQuery(window).width();
var newHeight = jQuery(window).height();
jQuery('#yt-container, #video-cover').width(newWidth).height(newHeight);
if (newHeight > newWidth / videoRatio) {
newWidth = newHeight * videoRatio;
}
jQuery('#myytplayer').width(newWidth).height(newWidth/videoRatio);
}

//]]>
</script>
And this one too:
<script type='text/javascript'>
//<![CDATA[
$().ready(function() {
$('body').tubular('61BLn00AN_w','wrapper-video');
});
//]]>
</script>
2. Then locate the <body> tag (CTRL + F)
Or if you are using a template from Template Designer, find this line:
<body expr:class='&quot;loading&quot; + data:blog.mobileClass'>
3. Under either of these two, add this:
<div id='wrapper-video'>
4. Now search for the </body> tag, and before it put this:
</div>
Save the changes and that's it. In red you must put the ID of Youtube video, the ID are the characters that appear at the end of the URL:


Remember: There is no option to mute, so if you don't want to have sound as in the demo blog, you have to choose a video that has no sound. I also recommend using a video in HD in case you don't want any black parts to show around it.

If you are using jQuery, remove other versions that you have to avoid duplication and have problems.

Author | jQuery Tubular

Create a Background Slideshow for Blogger

In the previous post we saw how to make the blog's background fill the screen regardless of the resolution of the monitor. The method that we'll use now with jQuery is a plugin called BackStretch which also has the option of creating a slideshow of pictures as a blog wallpaper without losing the property of adjusting to the width and height of the screen.

slideshow for blogger, blogger widgets

What we will do in this entry is just this, try to make the blog's background to have some images that are changing, all with fade effect between each transition.

You can see an example in this demo blog.

To put this slideshow in the blog's background, just go to Template - Edit HTML and before </head> add the following code:
<script src='http://ajax.googleapis.com/ajax/libs/jquery/1.10.2/jquery.min.js' type='text/javascript'/>
<script>
//<![CDATA[
/*
* jQuery Backstretch
* Version 1.2.8
* http://srobbin.com/jquery-plugins/jquery-backstretch/
* Add a dynamically-resized background image to the page
* Copyright (c) 2012 Scott Robbin (srobbin.com)
* Licensed under the MIT license
* https://raw.github.com/srobbin/jquery-backstretch/master/LICENSE.txt
*/
;(function(a){a.backstretch=function(p,b,l){function s(){if(p){var b;0==c.length?c=a("<div />").attr("id","backstretch").css({left:0,top:0,position:m?"fixed":"absolute",overflow:"hidden",zIndex:-999999,margin:0,padding:0,height:"100%",width:"100%"}):c.find("img").addClass("deleteable");b=a("<img />").css({position:"absolute",display:"none",margin:0,padding:0,border:"none",zIndex:-999999,maxWidth:"none"}).bind("load",function(d){var b=a(this),e;b.css({width:"auto",height:"auto"});e=this.width||a(d.target).width();d=this.height||a(d.target).height();n=e/d;q();b.fadeIn(g.speed,function(){c.find(".deleteable").remove();"function"==typeof l&&l()})}).appendTo(c);0==a("body #backstretch").length&&(0===a(window).scrollTop()&&window.scrollTo(0,0),a("body").append(c));c.data("settings",g);b.attr("src",p);a(window).unbind("resize.backstretch").bind("resize.backstretch",function(){"onorientationchange"in window&&window.pageYOffset===0&&window.scrollTo(0,1);q()})}}function q(){try{j={left:0,top:0},rootWidth=h=o.width(),rootHeight=r?window.innerHeight:o.height(),f=h/n,f>=rootHeight?(k=(f-rootHeight)/2,g.centeredY&&(j.top="-"+k+"px")):(f=rootHeight,h=f*n,k=(h-rootWidth)/2,g.centeredX&&(j.left="-"+k+"px")),c.css({width:rootWidth,height:rootHeight}).find("img:not(.deleteable)").css({width:h,height:f}).css(j)}catch(a){}}var t={centeredX:!0,centeredY:!0,speed:0},c=a("#backstretch"),g=c.data("settings")||t;c.data("settings");var o,m,r,n,h,f,k,j;b&&"object"==typeof b&&a.extend(g,b);b&&"function"==typeof b&&(l=b);a(document).ready(function(){var b=window,d=navigator.userAgent,c=navigator.platform,e=d.match(/AppleWebKit\/([0-9]+)/),e=!!e&&e[1],f=d.match(/Fennec\/([0-9]+)/),f=!!f&&f[1],g=d.match(/Opera Mobi\/([0-9]+)/),h=!!g&&g[1],i=d.match(/MSIE ([0-9]+)/),i=!!i&&i[1];o=(m=!((-1<c.indexOf("iPhone")||-1<c.indexOf("iPad")||-1<c.indexOf("iPod"))&&e&&534>e||b.operamini&&"[object OperaMini]"==={}.toString.call(b.operamini)||g&&7458>h||-1<d.indexOf("Android")&&e&&533>e||f&&6>f||"palmGetResource"in window&&e&&534>e||-1<d.indexOf("MeeGo")&&-1<d.indexOf("NokiaBrowser/8.5.0")||i&&6>=i))?a(window):a(document);r=m&&window.innerHeight;s()});return this}})(jQuery);
//]]>
</script>
<script>
//<![CDATA[
var images = [
 "Image URL",
 "Image URL",
 "Image URL",
 "Image URL",
 "Image URL",
  ];

  $(images).each(function(){
 $('<img/>')[0].src = this;
  });
  var index = 0;
$.backstretch(images[index], {speed: 1000});
  var slideshow = setInterval(function() {
  index = (index >= images.length - 1) ? 0 : index + 1;
    $.backstretch(images[index]);
  }, 5000);
//]]>
</script>
Here add the URLs of the images that will be the background of your blog.
If you would like to add more pictures, just add after the var images = [ another line like this:
 "Image URL",
The images will be changing in the order you have added them, if you want these to appear in a random order, then change the second part of the code with this:
<script>
//<![CDATA[
var images=new Array();
images[ 1 ]="Image URL";
images[ 2 ]="Image URL";
images[ 3 ]="Image URL";
images[ 4 ]="Image URL";
images[ 5 ]="Image URL";

  Array.prototype.shuffle = function() {
  var len = this.length;
  var i = len;
  while (i--) {
  var p = parseInt(Math.random()*len);
  var t = this[i];
  this[i] = this[p];
  this[p] = t;
  }
};

  images.shuffle();
  $(images).each(function(){
 $('<img/>')[0].src = this;
  });
  var index = 0;
$.backstretch(images[index], {speed: 1000});
  var slideshow = setInterval(function() {
  index = (index >= images.length - 1) ? 0 : index + 1;
    $.backstretch(images[index]);
  }, 5000);
//]]>
</script>
You can also add more pictures by adding a line like this:
images[ 6 ]="Image URL";
But you will see that in this case there are some consecutive numbers in blue, so if you add another such as 6, then the next one should be 7, etc..

In both cases you can change the duration of each image which is in the 5000 value that is at the end of the script.
The advantage of this slideshow in the blog's background is that images are automatically resized to the size of the monitor, so that, no matter of the resolution, it should look good.

It is worth remembering that if you are using Scriptaculous, you have to make some changes, and if you already use jQuery, should leave only one version.

Author page | Backstretch

Selasa, 17 September 2013

Vertical drop down menu with jQuery

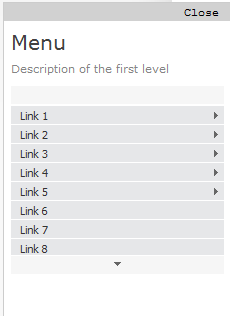
jGlideMenu is a vertical menu that can be dragged and dropped so that the reader can place it anywhere, and in addition, he can browse through the tabs in a very peculiar manner that comes with a sliding effect giving a sexy touch.

One of the advantages is that it can store a large number of links and can be removed anytime if we want.

vertical menu, menu for blogger

To understand this menu better and to see it in action, visit this demo blog. There we can drag the menu, navigate through its tabs or close.

To add this vertical menu on your blog, just follow these steps:

1) From your Blogger dashboard, go to Template > Edit HTML and before the </head> tag, add these scripts:
<script src='http://ajax.googleapis.com/ajax/libs/jquery/1.7.1/jquery.min.js' type='text/javascript'/>
<script src='http://ajax.googleapis.com/ajax/libs/jqueryui/1.7.1/jquery-ui.min.js' type='text/javascript'/>
<script src='http://helplogger.googlecode.com/svn/trunk/jQuery.jGlideMenu.min.js' type='text/javascript'/>

<script type='text/javascript'>
//<![CDATA[
$(document).ready(function(){
$('#jGlide_001').jGlideMenu({
tileSource : '.jGlide_001_tiles' ,
demoMode : false
}).show();

$('#switch').click(function(){$(this).jGlideMenuToggle();});
});
//]]>
</script>
2) Now paste before ]]></b:skin> these styles:
.jGM_box {
position: absolute; /* Change absolute with fixed if you want it to float */
top: 50px; /* Distance from above */
right: 760px; /* Distance from right */
width: 227px;
height: 317px;
background: #fff; /* Background color */
margin: 0;
padding: 0;
border: 1px solid #ccc; /* Border */
overflow: hidden;
}
.jGM_header {
position: absolute;
top: 0;
left: 0;
height: 18px;
width: 227px;
background: #d1d1d1; /* Background color for the up bar */
color: #fff;
text-align: right;
vertical-align: middle;
line-height: 18px;
cursor: move;
}
.jGM_header a {
margin-right: 12px;
text-decoration: none;
color: #000 !important;
cursor: pointer;
}
.jGM_wrapper {
position: absolute;
top: 19px;
left: 0;
width: 2270px;
height: 288px;
margin: 0;
padding: 0;
border: 0;
}
.jGM_tile {
position: absolute;
top: 0;
left: 7px;
width: 213px;
height: auto;
overflow: hidden;
margin: 0;
padding: 0;
border: 0;
display: block;
}
.jGM_cats {
width: 100%;
height: 64px;
overflow: hidden;
vertical-align: middle;
text-align: left;
}
.jGM_cats h4 {
font-family: Verdana,Arial,serif;
font-size: 1.8em;
margin: 0;
padding: 2px 0;
line-height: 1.8em;
color: #414141;
font-weight: normal;
}
.jGM_cats p {
font-family: Verdana,tahoma,arial;
font-size: 1em; /* Font size of the description */
margin: 0;
padding: 0;
line-height: 1.2em;
color: #858585; /* Description color */
font-weight: normal;
}
.jGM_pager {
height: 18px;
width: 213px;
line-height: 18px;
margin: 0;
border: 0;
padding: 0;
background: #f6f6f6;
text-align: center;
vertical-align: middle;
}
.jGM_pager a {
text-decoration: none;
font-weight: bold;
text-decoration: none;
display: block;
}
.jGM_pager a:hover { background: #d1d1d1; }
.jGM_pager img { border: 0; margin: 6px 0; }
.jGM_content {
width: 213px;
height: 150px;
margin: 1px 0;
padding: 0;
border: 0;
overflow: hidden;
}
.jGM_content a {
font-family: Tahoma,arial;
text-decoration: none;
color: #333 !important;
height: 18px;
width: 100%;
display: block;
line-height: 18px;
padding: 0 0 0 10px;
background-color: #e6e7e9;
margin: 1px 0;
}
.jGM_content a:hover {
color: #fff !important;
background-color: #4D4E67; /* Bar color on mouseover */
}
.jGM_more {
background-image: url(https://blogger.googleusercontent.com/img/b/R29vZ2xl/AVvXsEi0NjR-LSi_npfD90rmUlwmHuXV8jwtWBoibkd5CgzOuFZMk80Jq7J8-T2sA_8q_5t52Nt0ikwo0kMP7xhES3Z5CWWaqcyfuM6f35QWyly79RvqAubxfPw_qvRW9jVXoUoIngw7VXALKGM/s1600/arrow.gif);
background-repeat: no-repeat;
background-position: 203px 50%;
}
.jGM_back {
position: absolute;
top: 255px;
right: 0;
height: 18px;
width: 52px;
background: #d1d1d1;
line-height: 18px;
vertical-align: middle;
text-align: center;
margin: 10px 0 0 0;
padding: 0;
border: 0;
z-index: 99;
}
.jGM_back a {
height: 100%;
width: 100%;
text-decoration: none;
color: #000 !important; /* Color of the "Back" link */
display: block;
}
.jGM_back a:hover {
color: #fff !important; /* Color of the "Back" link on mouseover */
background: #4D4E67;
}
.jGM_reset {
position: absolute;
top: 255px;
right: 62px;
height: 18px;
width: 52px;
background: #d1d1d1;
line-height: 18px;
vertical-align: middle;
text-align: center;
margin: 10px 0 0 0;
padding: 0;
border: 0;
z-index: 99;
}
.jGM_reset a {
height: 100%;
width: 100%;
text-decoration: none;
color: #000 !important; /* Color of the "Home" link */
display: block;
}
.jGM_reset a:hover {
color: #fff !important; /* Color of the "Home" link on mouseover */
background: #4D4E67;
}
3) Now go to Layout and paste the structure of the menu inside a HTML/Javascript gadget:
<div class="jGM_box" id="jGlide_001">

<!-- Here all the links of the first level -->
<ul id="tile_001" class="jGlide_001_tiles" title="Menu" alt="Description of the first level">
<li rel="tile_002">Link 1</li>
<li rel="tile_003">Link 2</li>
<li rel="tile_004">Link 3</li>
<li rel="tile_006">Link 4</li>
<li rel="tile_007">Link 5</li>
<li><a href="URL address">Link 6</a></li>
<li><a href="URL address">Link 7</a></li>
<li><a href="URL address">Link 8</a></li>
<li><a href="URL address">Link 9</a></li>
<li><a href="URL address">Link 10</a></li>
<li><a href="URL address">Link 11</a></li>
</ul>

<!-- Here all the links of the second level -->
<ul id="tile_002" class="jGlide_001_tiles" title="Menu" alt="Description of the second level">
<li rel="tile_005">Link 1.1</li>
<li><a href="URL address">Link 1.2</a></li>
<li><a href="URL address">Link 1.3</a></li>
<li><a href="URL address">Link 1.4</a></li>
</ul>

<ul id="tile_003" class="jGlide_001_tiles" title="Menu" alt="Description of the second level">
<li><a href="URL address">Link 2.1</a></li>
<li rel="tile_008">Link 2.2</li>
<li><a href="URL address">Link 2.3</a></li>
</ul>

<ul id="tile_004" class="jGlide_001_tiles" title="Menu" alt="Description of the second level">
<li><a href="URL address">Link 3.1</a></li>
<li><a href="URL address">Link 3.2</a></li>
<li><a href="URL address">Link 3.3</a></li>
</ul>


<ul id="tile_006" class="jGlide_001_tiles" title="Menu" alt="Description of the second level">
<li><a href="URL address">Link 4.1</a></li>
<li><a href="URL address">Link 4.2</a></li>
<li><a href="URL address">Link 4.3</a></li>
</ul>

<ul id="tile_007" class="jGlide_001_tiles" title="Menu" alt="Description of the second level">
<li><a href="URL address">Link 5.1</a></li>
<li><a href="URL address">Link 5.2</a></li>
</ul>


<!-- Here all the links of the third level -->
<ul id="tile_005" class="jGlide_001_tiles" title="Menu" alt="Description of the third level">
<li><a href="URL address">Link 1.1.1</a></li>
<li><a href="URL address">Link 1.1.2</a></li>
</ul>


<ul id="tile_008" class="jGlide_001_tiles" title="Menu" alt="Description of the third level">
<li><a href="URL address">Link 1.2.1</a></li>
<li><a href="URL address">Link 1.2.2</a></li>
</ul>

</div>
Add the URLs of the links and the names of the tabs and that's it.
If you want to add more links to the first level, then add another line like this:
<li><a href="URL address">Link 12</a></li>
If you want to add another level to the link, then the line should be like this:
<li rel="tile_0010">Link 5</li>
Then in the area of ​​the second or third level, add a piece like this:
<ul id="tile_0010" class="jGlide_001_tiles" title="Menu" alt="Description of the second level">
<li><a href="URL address">Link 5.1</a></li>
<li><a href="Url address">Link 5.2</a></li>
</ul>
Here you should keep something in mind, if you look closely the link takes the REL attribute which must be the same as the ID we put on the second level, these IDs should not repeat and always be unique.
Yes, it sounds complicated, but once you understand the concept, you'll see that is actually pretty simple.

In the area of ​​the styles, there are the parts that can be customized. If you want the menu to be static, let's say you want to add it in the sidebar, then delete the first code of the script that is in italics. And in the CSS styles, remove this part:
position: absolute; /* Change absolute with fixed if you want it to float */
top: 50px; /* Distance above */
right: 760px; /* Distance to the right */
When there are many links then, there will be showing some arrows, so when you mouseover them, it will show the rest of the links either up or down.

Throughout the menu structure we can change the Menu name and the descriptions as well.

As this menu is made with JQuery, it is recommended to verify to have only one version of it.

Selasa, 03 September 2013

Possibly the most simple jQuery Slider

Do you have jQuery in your blog and space to insert 10 lines of code? If the answer is yes and you also want to have an automatic slideshow, this is the simplest code I've seen so far.

That code having a succession of simple images placed inside a box with a common general container would give this result:


1. Adding the JavaScript

If you do not have jQuery, then you should add this line just after ]]></b:skin> to load this popular slideshow:
<script src='http://ajax.googleapis.com/ajax/libs/jquery/1.8/jquery.min.js' type='text/javascript'/>

Once confident that we have the library in our template, we need to add the same line to make the series of images function as a slider:
<script type="text/javascript">//<![CDATA[
$(function(){
    $('#slider div:gt(0)').hide();
    setInterval(function(){
      $('#slider div:first-child').fadeOut(0)
         .next('div').fadeIn(1000)
         .end().appendTo('#slider');}, 4000);
});
//]]></script>

We can save changes to the template because that is all. It is simple but you will see that it works and does what it has to do. Now we just have to put the images where we want to display, in the manner discussed below.

2. Create the slider

After adding the codes above in our template (although you could add it directly into a gadget, on a page or even in an entry as you see here) we can create a viewer as you saw above. We just have to use this HTML structure below to add the images:
<div id="slider">
    <div><img src="IMAGE_URL"/></div>
    <div><img src="IMAGE_URL"/></div>
    <div><img src="IMAGE_URL"/></div>
</div>

I do not know how you see it but it is all you need.

For me this is quite lightweight and efficient, much more than most libraries that are used perhaps too often.

Settings


The last three numbers of the plugin allow us to adjust some things. All are expressed in milliseconds (4000 = 4 seconds)

fadeOut(0): Time for the outgoing image
fadeIn(1000): Time for the next image
('#slider');},4000): Time spent in each image

How it Works


And for the curious who want to learn things...

$('#slider div:gt(0)').hide();
With gt(x) we select all the divs from number x. In this case 0 is the first, so what we do with this line is to hide (hide) all the boxes except the first, which will be the image visible initially.

setInterval(function(){ [what we will do] }, 4000);
We need to reiterate a few things from time to time and we do with setInterval, indicating the delay time between each set.

$('#slider div:first-child').fadeOut(0)
Within each of these intervals we remove (fadeOut) the first box (div:first-child) that is in the relationship of images...

.next('div').fadeIn(1000)
...and we make the following box (next) appearing gradually (fadeIn).

.end().appendTo('#slider');
Finally we have the first image and place it at the end (appendTo) of the "list".

end() resets the count of elements that we move forward with next(). Thus, the first child made earlier to disappear is the one we sent down the stack and not the image that is now visible.

Variants and customization


As you have seen CSS is not necessary for the slider to work, but using it we can change its look, allow the use of images of different sizes, include labels and even improve the transition. Here are some ideas.


DEMO TEXT1


DEMO TEXT2


DEMO TEXT3


We can limit the overall container size and prevent overflow for larger images. And then we will put rounded corners, border and then center them.
#slider {
overflow: hidden;
width: 500px;
height: 300px;
border:3px solid #b8b8b8;
border-radius: 40px;
margin: 0 auto;
padding: 0;
position: relative;
}

If we place the parent boxes of the images absolutely with respect to the general container (for that we put before the relative), these will overlap each other. In this way the fadeOut may give them some time to be "visible" (we changed 0 to 1000) and a smoother transition between images. The mixture of images is produced in the second demo.

In the images, the max-width serves us to always take up the entire width and min-height so that even if they are distorted, there will remain no space below when they are less than 300px.
#slider > div {
position:absolute;
top:0;
left:0;
}
#slider img {
width:100%;
min-height:300px;
margin:0;
padding:0;
border:0;
}

And if we add other elements on the images (in this example a text), we'll just label them with a span or paragraph (p) and position them in the CSS in an absolute manner, placing them in the exact place where we want with top/bottom - left/right.
#slider p {
position: absolute;
bottom: 30px;
left: 0;
display: block;
width: 400px;
height: 24px;
margin:0;
padding: 5px 0;
color: #eee;
background: #990000;
font-size: 22px;
line-height:22px;
text-align:center;
}

The markup in the HTML for this last, includes also a link to the image, so it would be like this:
<div id="slider">
<div><a href="Link_URL1"><img src="Image_URL1" /></a><p>TEXT1</p></div>
<div><a href="Link_URL2"><img src="Image_URL2" /></a><p>TEXT2</p></div>
<div><a href="Link_URL3"><img src="Image_URL3" /></a><p>TEXT3</p></div>
</div>

Minggu, 02 Juni 2013

Fade In/Out Page Loading Effect On Blogger Posts

A very common effect in jQuery is the fade effect that hides or shows an element by fading it, and we can use it in many ways as for example in the blog's navigation. The following script does just that, by loading the page with a fading effect when we browse on internal links that are in the blog, such as post titles, labels links, archive, navigation links, etc..
jQuery effect, fade in effect, blogger jQuery
You can see an example in this demo blog, click on the title of any post and see the fading effect when the page is loading.

How To Implement the Fade In Loading Effect

1) To put this fading effect on your blog, go to your Template > Edit HTML :

fading effect, blogger blogspot, blogger tricks

2) Click anywhere inside the code area and search for the </head> tag using CTRL + F keys:


3) Then, just above </head> add the following code:
<script src='http://ajax.googleapis.com/ajax/libs/jquery/1.8.2/jquery.min.js' type='text/javascript'/>
<script type='text/javascript'>
//<![CDATA[
$(document).ready(function() {
$("body").css("z-index", "-10");
$("body").fadeIn(0);

$("a").click(function(event){
event.preventDefault();
linkLocation = this.href;
$("body").fadeOut(500, redirectPage); });
function redirectPage() {
window.location = linkLocation;
}
});
//]]>
</script>
<style>
html {
background-color: #F2F2F2; /* Color fading */
}
</style>
4) Save the changes and that's it. In green you can see where to change the color that fades on a loading page.

The original script hides the body of the page while loading, I prefer to change that property with a negative z-index to avoid problems with the search engine robots that may effect the positioning.

Problems?

Consider that such effects could increase the blog loading time, so I recommend using it only when your blog loads fast and does not have too many scripts.

If you already use another version of jQuery remove the other, leaving only this which will be readed first.

If you are using Mootools or Scriptaculous, then you have to make some modifications to the code in order to be compatible.

If you have another script with a fade effect, then it could interfere with this and you might not see anything on the page except the color fading, in such cases it is better without this script.

You can also use this effect only on some links, for example, if you want to appear only when you click on the post titles in the navigation links (older posts and newer posts), and on the top tabs, then replace this line:
$("a").click(function(event){
With this:
$(".post-title a, .blog-pager-older-link, .blog-pager-newer-link, .tabs").click(function(event){
In some cases, the page can load for a second and then load with the fade effect, this may be "normal" because the browser is slow to read the script on page load.

Apart from these drawbacks, I think it's a very elegant way to load blog pages while browsing them, don't you think?

Selasa, 06 Maret 2012

Add Css/Jquery fixed horizontal menu to blogger blog

This navigation bar gets semi-transparent when you scroll down the page and is slightly showing up by fading out and becoming almost transparent. When the user hovers over it, the menu becomes opaque again.

Inside of the navigation there are some links, a search input and a top and bottom button that allows the user to navigate to the top or bottom of the page.


Let's start adding it...

1. Go To Blogger - Template - Edit HTML


 ....and select the "expand widget templated" box:


2. Search (using CTRL + F) for this piece of code:

</head> 

3. Just above/before the </head> tag, add this code:

<link rel="stylesheet" href="http://helplogger.googlecode.com/svn/trunk/html/[helplogger.blogspot.com]Fixed Fade Out Menu.css"/>
<script type="text/javascript" src="http://helplogger.googlecode.com/svn/trunk/html/[helplogger.blogspot.com]jquery-1.3.2.js"></script>
 <script type="text/javascript">
            $(function() {
                $(window).scroll(function(){
                    var scrollTop = $(window).scrollTop();
                    if(scrollTop != 0)
                        $('#nav').stop().animate({'opacity':'0.2'},400);
                    else   
                        $('#nav').stop().animate({'opacity':'1'},400);
                });
               
                $('#nav').hover(
                    function (e) {
                        var scrollTop = $(window).scrollTop();
                        if(scrollTop != 0){
                            $('#nav').stop().animate({'opacity':'1'},400);
                        }
                    },
                    function (e) {
                        var scrollTop = $(window).scrollTop();
                        if(scrollTop != 0){
                            $('#nav').stop().animate({'opacity':'0.2'},400);
                        }
                    }
                );
            });
        </script>

4) Now search for this tag:

<body>  

If you can't find it, search for this one:

<body expr:class='&quot;loading&quot; + data:blog.mobileClass'>

5) Just below/after this code, copy and paste the following code:

<div id="nav">
<ul>
<li><a class="top" href="#top"><span></span></a></li>
<li><a class="bottom" href="#bottom"><span></span></a></li>
<li><a href='URL address'><span>Link 1</span></a></li>
<li><a href='URL address'><span>Link 2</span></a></li>
<li><a href='URL address'><span>Link 3</span></a></li>
<li><a href='URL address'><span>Link 4</span></a></li>
<li><a href='URL address'><span>Link 5</span></a></li>
<li><a href='URL address'><span>Link 6</span></a></li><li class="search">

<input type="text"/><input class="searchbutton" type="submit" value=""/>
</li>
</ul>
</div>
<div id="top"></div>
<div class="desc"></div>
<div id="bottom"></div>
<div class="scroll"></div>

Note: Replace URL address with the URL of your pages and Link 1, 2, 3, 4, 5, 6 with the name of the link that will appear in the menu.

6) Now click on the Save Template button and you're done ;)

Credit goes to the original author. This widget was inspired by David Walsh’s top navigation bar.

Kamis, 25 Maret 2010

100+ Collection Of New Jquery Plugins And Tutorials

10 New jQuery Plugins You Have to Know

I haven't done a roundup for jQuery plugins for quite a while, but I have noticed that there are quite a few of new jQuery plugins out there and they really caught my attention because of its design and application. So, this is the 10 jQuery plugins that I have collected for last few weeks.


New jQuery Plugins You Have to Know


30 The Best jQuery plugins inspired from Twitter and Facebook

jQuery is a fast and concise JavaScript Library that simplifies HTML document traversing, event handling, animating, and Ajax interactions for rapid web development. jQuery plugins are an integral part of modern web design.


The Best jQuery plugins inspired from Twitter and Facebook


20 Superb jQuery Plugins to Enhance Your Photo Gallery.

We can’t stop admiring this great new technology – jQuery and it really seems that web developers just don’t want to stop creating more and more new and awesome plugins that can do simply anything. Looks like you can’t find a more convenient way to enhance your website than by using jQuery tools. Graphic content means a lot in today’s web and we’ve decided to create a small collection of most notable jQuery plugins that will enrich and enhance your Photo Gallery. So, let’s start!


Superb jQuery Plugins to Enhance Your Photo Gallery


21 Best jQuery Tooltip Plugins, Demos, Examples & Tutorials

Today we are posting some attractive, Handy and useful jquery Tooltip plugins for your new projects. If the tooltip is being used appropriately, it can improve our site’s user friendly level, and also save us a lot of spaces.


Best jQuery Tooltip Plugins, Demos, Examples


5 Fresh jQuery Plugins Make You Love Your HTML Forms More

Working with HTML forms is really a nightmare because your forms always mess up. This post includes 5 newest and useful jQuery plugins that help you work with HTML forms better and love them more. Enjoy the post in the series of jQuey plugins that is always fresh and useful.


Fresh jQuery Plugins Make You Love Your HTML Forms More


25 Incredible jQuery Slider Tutorials and Plugins

Content sliders are a great way to show large amount of content or images on a smaller area in a website or blog. They are commonly used in portfolio sites, corporate sites or blogs. You may probably heard that jQuery isn’t very hard to learn. If you are interested in implementing a content slider in your website please check our jQuery tutorials and plugins collection.


9 Useful jQuery Calendar And Date Picker Plugins For Web Designers

Event calendars and date pickers are really useful plugins for web applications. Wordpress does have a date picker, which allow bloggers to schedule the article.


10 New jQuery Plugins To Spice Up Your Website

jQuery is an amazing JavaScript library that makes it easy to create wonderful web effects in just a few lines of code. It was released in January 2006 at BarCamp NYC by John Resig. jQuery is designed to change the way that you write JavaScript. Here are some stunning new jQuery plugins that will make your website fancy and cool.


Selasa, 23 Maret 2010

Jquery-Ajax Tutorials And Examples

5 Ways to Make Ajax Calls with jQuery

There are at least five ways to make AJAX calls with the jQuery library. For beginners, however, the differences between each can be a bit confusing. In this tutorial, we’ll line them up and make a comparison. Additionally. we’ll review how to inspect these AJAX calls with Firebug as well.


Ways to Make Ajax Calls with jQuery


Beginners Guide to Using AJAX with jQuery

AJAX offers users a seamless way to work with your interface, no waiting for whole pages to load. jQuery has a set of tools to make it super simple to implement. We will walk you through how to use jQuery to connect to PHP so you can step up your user interface.


Beginners Guide to Using AJAX with jQuery


Quick and Dirty AJAX

I’m trying something a little different today. It took me a while to figure out why I couldn’t open a free account with YouTube for about 3 weeks but now that it’s all straightened out I thought I’d upload a video where I walk you through some of the basic ways you could use jQuery to add AJAX functionality to your site.


Simplify Ajax development with jQuery

jQuery is a JavaScript library that helps simplify your JavaScript™ and Asynchronous JavaScript + XML (Ajax) programming. Unlike similar JavaScript libraries, jQuery has a unique philosophy that allows you to express common complex code succinctly. Learn about the jQuery philosophy, discover its features and functions, perform some common Ajax tasks, and find out how to extend jQuery with plug-ins.


Fancy Quotes With jQuery, AJAX & CSS

Today we are making a fancy quote rating system that will display a number of famous quotes and will enable our site visitors to rate their favorites.


Senin, 15 Maret 2010

77 Best Jquery Tips I Have Ever Read

10 Easy jQuery Tricks for Designers


There are plenty of jQuery tricks and techniques out there, and the vast and powerful jQuery library can meet almost anyone’s JavaScript’ing needs. Since jQuery makes JavaScript accessible to designers who want to add simple interaction and visual techniques into their design without knowing extensive programming knowledge, it’s worth a few moments to explore this excellent library.


8 awesome JQuery tips and tricks


Who doesn't like JQuery? This fast and easy to use Javascript framework became very popular in 2008. In the following article, I have compiled a list of 8 absolutely useful JQuery hacks, tips and tricks.


20 Top jQuery tips & tricks for jQuery programmers


Following are few very useful jQuery Tips and Tricks for all jQuery developers. I am sharing these as I think they will be very useful to you.


5 Tips for Better jQuery Code


I've been coding using jQuery since shortly after it came out, and well -- I've been using it almost every work day. Here is a few tips that have saved me time.


10 Advanced jQuery Performance Tuning Tips from Paul Irish


26 cool and useful jQuery tips, tricks & solutions


The use of the jQuery library is growing and growing(just released jQuery 1.4), more and more people are using this useful javascript library. This means that more and more useful jQuery tips, tricks and solutions are coming available. That’s why i created a small list of 26 cool and useful jQuery tips, tricks and solutions.

Sabtu, 13 Maret 2010

6 Useful Jquery Tutorials For Playing With Twitter API

Create a Fun Tweet Counter With jQuery


n this tutorial, we will look at using jQuery to call Twitter’s API and then use the results to create a widget for a blog or personal website that shows what hours during the day we tweet at the most.


A jQuery Twitter Ticker


In this tutorial we are going to create a pure jQuery & CSS twitter ticker which utilizes Twitter’s Search API. It will show your or your friends’ latest tweets, and will not require any server side code or databases. As a result, the ticker will be easily included into any web page and easily modified to your likings.


jQuery Twitter API plugin


You might have noticed that I am talking and spending more time on Twitter lately. I have been helping Twitter users with their jQuery related questions and problems as well. If you are using Twitter and have some kind of jQuery related question I will be happy to help.


How To Get Digg, Delicious and Tweet Counts Using jQuery


Majority of online services allow you to access some of their data through public API methods. Unfortunately most of the data formats served by these APIs can only be accessed using server side code. This is mainly due to JavaScript’s same origin policy, which restrict it from loading data from remote sites.


Using the Twitter Search API


Twitters new search feature is great for finding interesting people and topics to follow. So i wrote a script to get search results from twitter and display them on your site. This could be integrated into an existing application or used standalone to follow a particular topic or keyword on twitter,


jQuery – PHP & Ajax with the Twitter API


So for today’s blog post I am going to show you how you can use jQuery, PHP and a little ajax to connect up to the Twitter API and return results. I’ll cover off unauthenticated calls today to the search API, and follow up with the authenticated piece a little later, so watch out for that!

Rabu, 10 Maret 2010

A how to guide – Live Email Validation

In this tutorial I will describe how you can validate the format of an email address “live” using jQuery and regular expressions without the need for a plugin (See Demo). The code is pretty lightweight, uses a simple jQuery event to fire the code, and gives the user great visual feedback on whether what they’ve entered is good, or bad… so here we go


Source

Jquery Plugin : 4 Jquery Zoom Image Plugins (Click + Hover Zoom)

Zoomimage - jQuery plugin


Present you images in stylish way. The links are unobtrusively highjacked to open the images in an inpage popup with drop shadow and border.


jQuery Simple ZoomGlass plugin


This is a simple jQuery plug-in for zooming images. Most of the functionalities come from jquery lens plugin and jquery clippedImage. Complex application always come from simple example.


JQZoom


JQZoom allows you to realize a small magnifier window close to the image or images on your web page easily.


jQuery plugin : Fancy Zoom


This plugin is the jQuery version on the fancy zoom effect. As describe on the fancy zoom web site, this effect is providing a smooth, clean, truly Mac-like effect, almost like it's a function of Safari itself (see the demo below).


Senin, 08 Maret 2010

Jquery Plugin : 6 Cool Jquery Color Pickers

Jquery Color Pickers - If you are looking for jquery color pickers,these might help you out.


Color Picker - jQuery plugin


A simple component to select color in the same way you select color in Adobe Photoshop


jQuery Color Picker


Farbtastic: jQuery color picker plug-in


Farbtastic is a jQuery plug-in that can add one or more color picker widgets into a page through JavaScript. Each widget is then linked to an existing element (e.g. a text field) and will update the element's value when a color is selected.


Intelliance:Jquery Color Picker


mlColorPicker


Syronex:JQuery Color Picker


Minggu, 07 Maret 2010

Jquery 1.4 Full Documentation In Chm Format

This is Jquery 1.4 full documentation in chm format for Jquery wizard :).It's very useful.You dont need to go online only to look for any documentation (function,selector etc) you need to know.Thanks to charupload.wordpress.com who have compiled this into chm.


Download Jquery 1.4.chm

Selasa, 02 Maret 2010

30 The Best jQuery plugins inspired from Twitter and Facebook

jQuery is a fast and concise JavaScript Library that simplifies HTML document traversing, event handling, animating, and Ajax interactions for rapid web development. jQuery plugins are an integral part of modern web design. jQuery plugins gives web designers a wide range of activities and opportunities to develop a wide range of variation effects to your websites. The plugins below will allow you to insert in to your website very interesting effects of Social media giants: Twitter and Facebook. If you want to create Facebook like Twitter fan page or Facebook post on Wall effect, these plugins are for you.


Source

Senin, 01 Maret 2010

20 Best Jquery And MooTool Calendar Scripts

If you are looking for good calendar script based on Jquery or MooTool to be installed on your web site,you might tempted to use one of these great calendar scripts !! Here is collection of best jquery and mootool scripts.


MooTools DatePicker


Smoothly animating and very configurable. No Ajax - pure Javascript.

Will work for any date-format and even supports time-picking.

4 skins ready for download, and it's easy to skin it yourself.


9 Useful jQuery Calendar And Date Picker Plugins For Web Designers


I am a big fan of jQuery, so i always use jQuery Calendar plugins to accomplish my tasks when the clients asked me to implement an event caldendar for them. In this article, i would like to share 9 really useful jQuery Event Calendar and Date Picker plugins that every web designers and developers should know.


10 Beautiful jQuery and MooTool Calendar Plugins


There are a lot of calendar plugins out there, in this article, we will go through all the powerful and beautiful jquery and mootool calendar plugins for your upcoming projects.


8 Useful jQuery Calendar, Date Picker and Time Formatting Plugins that You Should Know


jQuery is one of the most popular Javascript library. It’s easy to use, flexible, and most of all there’s a lot of jQuery tutorials and plugins available out which ease the the creation of dynamic effects and web controls. jQuery has become one of the most used JavaScript libraries today and can be found in the core of popular products like Wordpress, joomla and Drupal.